Crochet Shorts Pattern Free Video Tutorial
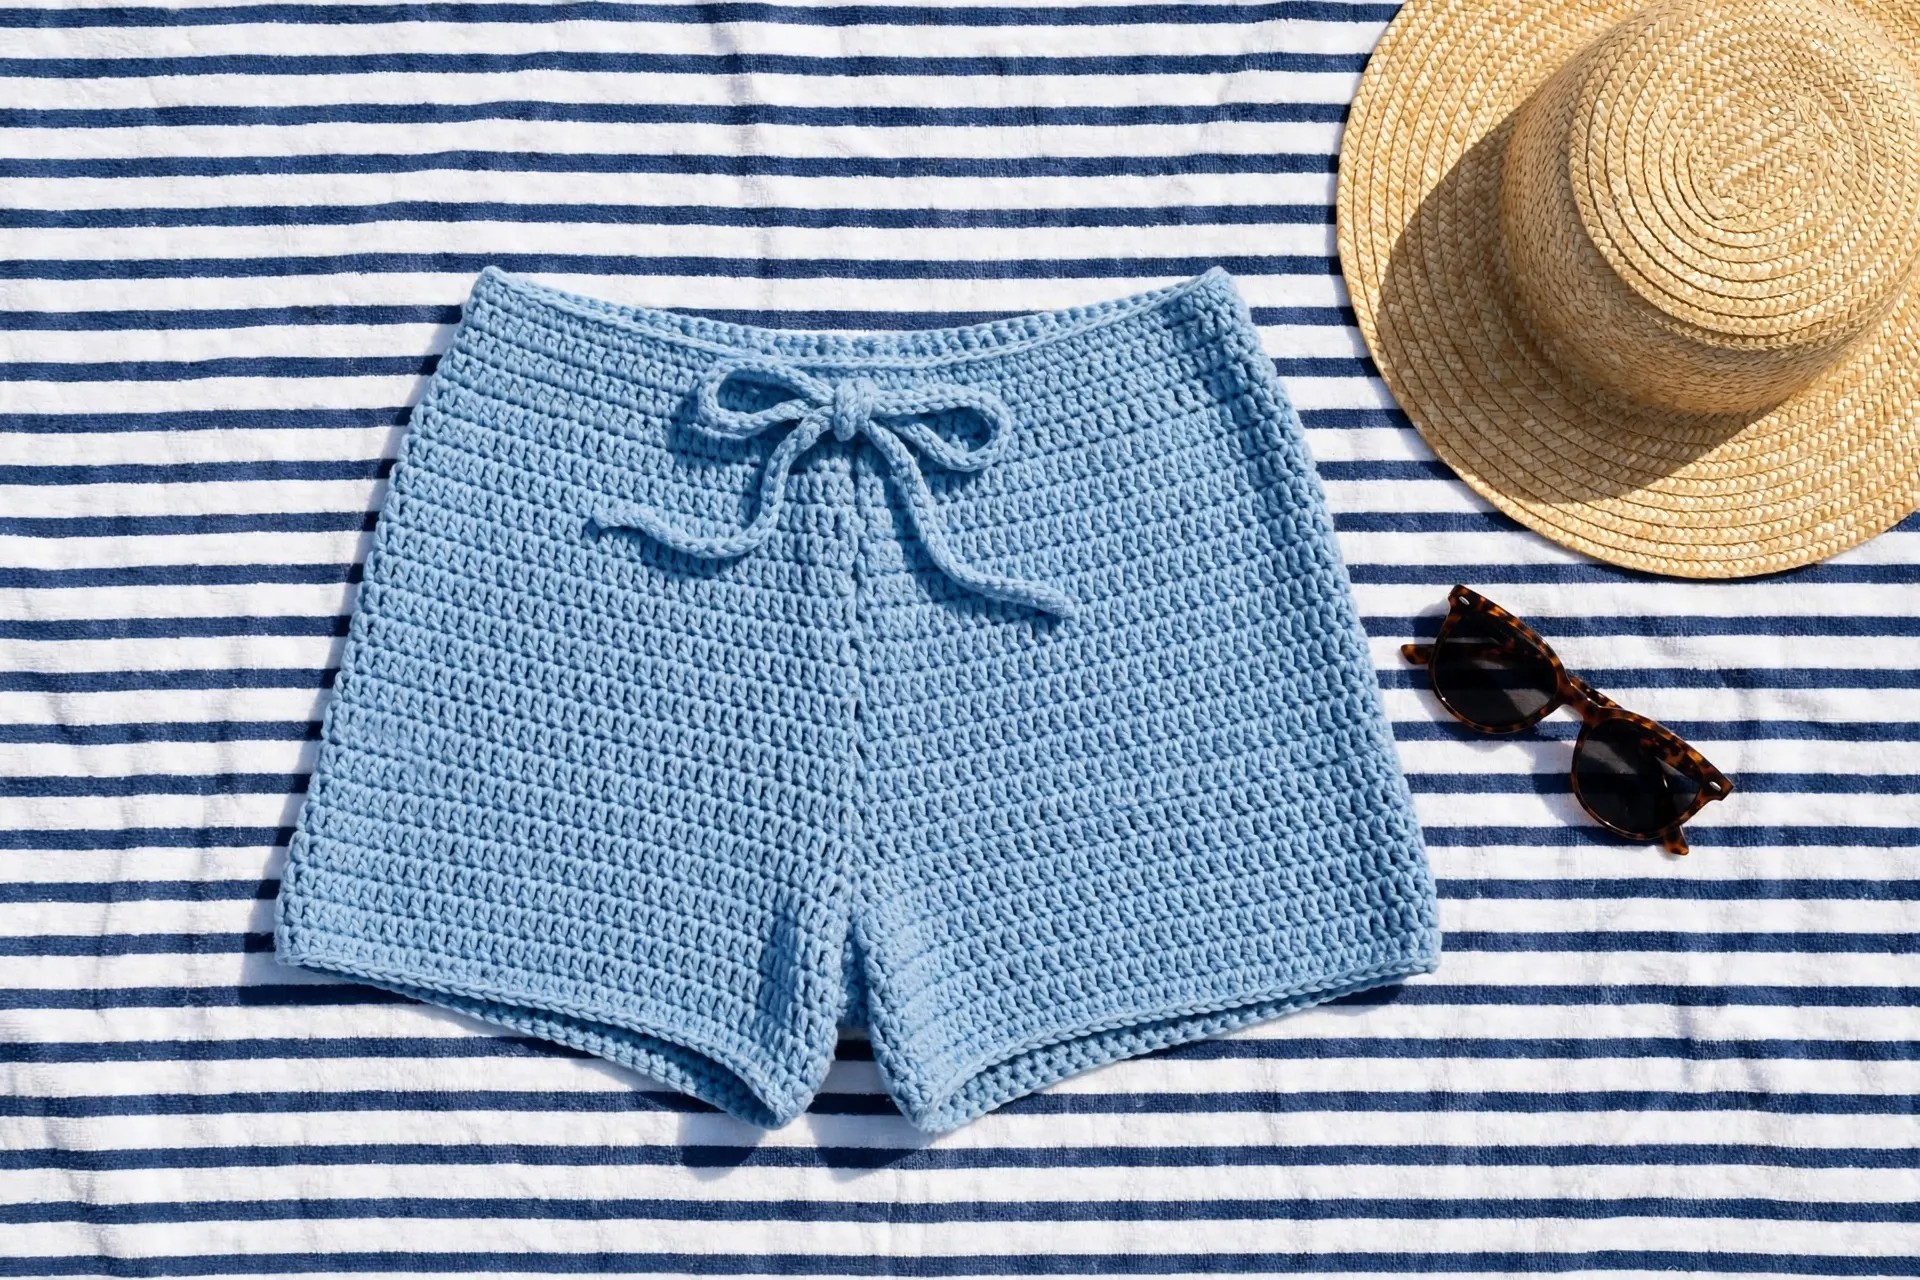
A good pair of handmade shorts is the summer project you end up living in — beach days, garden afternoons, holidays, lazy Sundays. This crochet shorts pattern is written out in full below, every row counted, so you do not have to pause a video every thirty seconds to check where you are. The design is deliberately simple: two flat panels worked from the waistband down in half double crochet, a gentle crotch curve shaped with centre increases, straight legs, and a folded waistband casing with a crocheted drawstring that cinches the panels in to fit your waist.
The Complete Crochet Shorts Pattern: Easy Drawstring Shorts, Written in Full
Of all the crochet shorts pattern designs I have worked, this is the one I hand a garment beginner first. There is no waist shaping to calculate, no sleeves, no buttonholes — just two identical rectangles that grow a crotch curve and split into legs. The main size (women’s M) is written in full below; other sizes are in the sizing table, with the counts to change.
Materials
- Worsted weight (#4) 100% cotton or cotton-blend yarn: approx. 700 yd (640 m) for size M — about four standard 175 yd balls of kitchen cotton. Cotton barely stretches, breathes in heat, and keeps the stitches crisp
- 5.5 mm (US I-9) crochet hook
- Yarn needle with a large eye
- Scissors
- Stitch markers
- Measuring tape
- Optional: 1 in (2.5 cm) wide elastic, cut to your waist measurement minus 2 in (5 cm), instead of the drawstring
Gauge and Finished Size
Gauge: 12 hdc and 9 rows = 4 in (10 cm) in half double crochet.
Finished size (M): hip about 44 in (112 cm) around — a relaxed fit over a 38–40 in (97–102 cm) hip. Waist the same 44 in (112 cm) before the drawstring is tied; the casing and cord pull it in to fit a 28–30 in (71–76 cm) waist with gentle gathers. Rise about 11 in (28 cm), inseam about 3.5 in (9 cm), leg opening about 24.5 in (62 cm) around.
Swatch first: chain 16, work 10 rows of half double crochet, and measure the middle. You want 12 stitches and 9 rows inside 4 in (10 cm). Too many stitches — go up a hook size; too few — go down. One stitch per 4 in changes the hip by over an inch, so the swatch matters. If yarn weights are new to you, the Craft Yarn Council’s standard yarn weight system explains what the #4 on the label means.
Abbreviations (US Terms)
- ch = chain
- hdc = half double crochet
- sc = single crochet
- sl st = slip stitch
- st(s) = stitch(es)
- inc = increase (2 hdc in the same stitch)
Step 1 — Gather Your Materials and Check Your Gauge

Lay out your yarn, hook and tools, then work the gauge swatch above and adjust your hook until you match it. Then measure yourself honestly: fullest part of the hip, natural waist, and the top of one thigh. Write the numbers down — the sizing table and the Step 5 fit check both work from them.
Step 2 — Work the First Panel: The Hip Section

The two panels are identical, so this step and Step 3 make the front; Step 4 simply repeats them for the back.
- Ch 67.
- Row 1: Hdc in the 3rd ch from the hook (the 2 skipped chains count as the first hdc) and in each ch across. (66 sts)
- Rows 2–21: Ch 2 (counts as an hdc), turn, hdc in each st across. (66 sts)
Your panel should now measure about 22 in (56 cm) wide and 9.3 in (23.5 cm) long. Count at the end of every few rows — 66, every time: one lost stitch per row becomes a slanted side seam by the crotch. Keeping that count steady is what keeps this crochet shorts pattern hanging straight instead of slanting.
Step 3 — Shape the Crotch Curve, Then Split for the Legs

The crotch curve is built with increases worked in the two centre stitches of the panel. Place a stitch marker in stitch 33 so you can find the centre without counting every row.
- Row 22: Ch 2, turn, hdc in each st up to the 2 centre sts, 2 hdc in st 33, 2 hdc in st 34, hdc in each st to the end. (68 sts)
- Row 23: Repeat the increase row, working 2 hdc in each of the 2 centre sts (now sts 34 and 35). (70 sts)
- Row 24: Repeat, increasing in sts 35 and 36. (72 sts)
- Row 25: Repeat, increasing in sts 36 and 37. (74 sts)
The panel is now 25 rows long — about 11 in (28 cm) from waist to crotch — and widest at the bottom edge, which is exactly the curve a body needs.
Now split for the legs. The left leg uses sts 1–37, the right leg sts 38–74.
- Leg A, Row 26: Ch 2, turn, hdc in the first 37 sts only. Leave the remaining 37 sts unworked.
- Leg A, Rows 27–33: Ch 2, turn, hdc in each st across. (37 sts — 8 leg rows in total, about 3.5 in / 9 cm)
Fasten off Leg A. Rejoin the yarn in st 38 of Row 25 with a sl st, ch 2, and work Leg B exactly the same: 8 rows of 37 hdc. Fasten off.
Step 4 — Work the Second Panel

Make a second panel exactly as in Steps 2 and 3. Lay the two side by side: same width top and bottom, legs the same length. Half an inch disappears in seaming; anything bigger is worth a row more or less on the shorter panel.
One honest option: if you like a higher rise at the back, work 2 extra plain rows on this second panel after Row 21, before the increase rows. The stitch counts do not change — 66 sts rising to 74 — the back waist simply sits about 1 in (2.5 cm) higher, which many people find more comfortable sitting down. That small rise change still leaves this crochet shorts pattern simple to finish.
Step 5 — Seam the Panels

Lay the front panel on top of the back panel with the wrong sides facing out. Pin the side edges together from waist to leg hem, then whipstitch or mattress-stitch down each side seam with matching yarn, keeping the seam flat and slightly stretchy — a rigid seam pulls when you sit.
Then pin and sew the inner leg seams: front Leg A to back Leg A, front Leg B to back Leg B, from the crotch point down to each hem. Turn the shorts right side out and try them on — the hip should feel roomy and the legs should slide over your thighs without digging. That first try-on is the best moment to check this crochet shorts pattern against your measurements.
Step 6 — Fold the Waistband Casing and Add the Drawstring

Fold the top edge 1 in (2.5 cm) to the inside, all the way around, and pin. Sew the folded edge down with the yarn needle, working through the row ends just below the fold, and leave a 2 in (5 cm) gap unsewn at the centre front — that gap is where the drawstring comes out.
Make the drawstring cord: ch 150 (about 55 in / 140 cm), then sl st in the 2nd ch from the hook and in each ch across. Knot each end, clip a safety pin to one end, and thread the cord through the casing, in and out of the centre-front gap. Try the shorts on and tie.
Prefer elastic? Thread it through the same casing instead, overlap the ends by 1 in (2.5 cm), sew them flat together, then sew the gap closed. Elastic gives a cleaner front; the drawstring gives an adjustable fit after big lunches.
Step 7 — Edge the Legs and Finish

Join the yarn at the inner seam of one leg. Ch 1, then work 1 sc in each stitch around the leg opening — 74 sc, one in each stitch of the front and back leg hems — and join with a sl st to the first sc. Fasten off and repeat on the second leg. This single round firms the hem, stops it curling, and gives the shorts their finished edge.
Weave in every end in two directions. Lay the shorts flat, smooth the seams, mist lightly with water and leave to dry — cotton relaxes into shape without hard blocking. Store folded, not hanging, so the waistband does not stretch. With the ends woven in, this crochet shorts pattern is ready to wear.
Sizing and Fit Guide for Your Crochet Shorts Pattern
A crochet shorts pattern lives or dies on the fit, and the fit here comes from three things: the panel width sets the hip, the increase rows set the leg opening, and the drawstring sets the waist. The main size M is written in full above. For the other sizes, keep every instruction identical and change only these counts:
- Size XS/S: hip 34–36 in (86–91 cm); panel chain 61; panel sts 60; after increases 68; sts per leg 34; total hip rows 24 (last 4 are increase rows); leg rows 8; yarn approx. 600 yd (550 m)
- Size M (main): hip 38–40 in (97–102 cm); panel chain 67; panel sts 66; after increases 74; sts per leg 37; total hip rows 25 (last 4 are increase rows); leg rows 8; yarn approx. 700 yd (640 m)
- Size L/XL: hip 42–46 in (107–117 cm); panel chain 79; panel sts 78; after increases 86; sts per leg 43; total hip rows 27 (last 4 are increase rows); leg rows 9; yarn approx. 850 yd (780 m)
Three fit rules save every pair. First, measure your hip, not your jeans size — the tape decides, and the relaxed panels forgive a couple of inches either way. Second, check the leg opening against your thigh: the finished opening in inches is roughly your after-increase stitch count divided by 3, and it wants to be at least an inch bigger than your thigh. Third, try on before the drawstring — rows are easy to change at the leg stage, miserable after the casing is sewn.
Length is the easiest adjustment of all: each extra leg row adds about 0.45 in (1.1 cm), the same number on all four legs. Those small adjustments are why this crochet shorts pattern fits so many bodies well.
Choosing Summer Yarn for Crochet Shorts
Most of the success comes down to fibre, because shorts work harder than almost any other crochet garment: they stretch, rub, sit and sweat. Cotton is the default for good reason — it breathes, absorbs, barely stretches, and survives weekly washing; a cotton-bamboo blend drapes a little softer if plain cotton feels stiff to you. Acrylic works for a lounge pair worn at home, but it traps heat outdoors and pills between the thighs faster than cotton. Stay at worsted (#4) or DK (#3) weight: chunkier yarn makes shorts that feel like armour, and fine yarn takes forever at garment scale. Dark colours also hide the slight see-through crochet fabric has in bright sun. Getting that fibre choice right is what makes this crochet shorts pattern comfortable enough to wear all day.
How to Style Your Crochet Shorts
At the beach, pull them over a swimsuit — cotton dries slowly, so treat them as a cover-up for the walk and the café, not for swimming.
For daytime, pair them with a plain vest top or one of these crochet tank top patterns for a fully handmade outfit.
For evenings, add a light layer: this breezy mesh summer poncho skims over shorts beautifully, and a lacy elegant butterfly top dresses the same shorts up.
Variations on the Basic Shorts
Once the basic crochet shorts pattern fits you, every variation below is a small change to the same panels — no new skills required.
Longer Bermuda Length
Work 16 leg rows instead of 8 on every leg for a knee-skimming Bermuda style (about 7 in / 18 cm inseam). Add roughly 150 yd (140 m) more yarn, and keep the leg edging — longer legs curl more without it.
Striped Shorts
Change colour every 4 rows in the hip section and work the legs in the main colour. Carry the unused colour up the side edge inside the seam allowance rather than cutting it — the side seam hides the floats completely. Those small changes keep this crochet shorts pattern fresh without learning anything new.
Scalloped Leg Edging
Swap the Step 7 single crochet round for a shell edge: skip 1 st, 5 dc in the next st, skip 1 st, sc in the next st, repeated around each leg. It turns the plainest pair into something deliberately pretty, and it is the version people ask about.
Common Shorts Mistakes (and How to Avoid Them)
- Skipping the thigh check. Hip fits, legs strangle — the classic shorts failure. Compare your after-increase count ÷ 3 against your thigh before you split the legs.
- Making the panels different lengths. Row gauge drifts between sittings. Count rows, not inches, and lay the panels together at Step 4.
- A crotch seam that pulls. The increase rows were skipped or halved. Those 8 added stitches are the difference between sitting comfortably and standing all evening.
- Working too loosely. Shorts in a drapey, open fabric stretch out of shape and show more than planned. If you can see daylight through the fabric held up to a window, go down a hook size.
- Cutting the drawstring too short. It must circle your waist, thread 44 in of casing, and still tie. The 55 in cord in Step 6 is not generous — it is correct.
Avoiding those traps is how this crochet shorts pattern turns out wearable rather than disappointing.
Frequently Asked Questions
Is this crochet shorts pattern suitable for beginners? Yes, for a confident beginner. It uses only chain, half double crochet and single crochet, both panels are identical, and the only shaping is the centre increase row, explained stitch by stitch in Step 3. A kind first garment: no sleeves, no fitting curves beyond the crotch increases.
What is the best yarn for a crochet shorts pattern? A worsted weight cotton or cotton blend. Cotton barely stretches, so the shorts keep their shape through a day of sitting and walking, and it breathes in heat. Save soft acrylic for a lounge pair worn at home.
Can I make the shorts longer or shorter? Easily — length lives in the legs, not the body. Each leg row adds about 0.45 in (1.1 cm): fewer rows for a shorter beach style, up to 16 for Bermudas, keeping all four legs identical.
Will the waist really fit without elastic? Yes. The panels are deliberately straight and wide, and the drawstring gathers them to your actual waist — that gathering is the design, not a flaw. If gathers are not your look, use the Step 6 elastic option for a flatter front.
How do I wash crochet cotton shorts? Machine wash gentle in cool water, reshape while damp, and dry flat — hanging them wet stretches the waistband. Cotton softens with washing and holds its shape for years.
Final Thoughts
The real lesson of this crochet shorts pattern is that a wearable garment does not need complicated shaping — it needs honest measurements, a stitch count that adds up, and a waistband that adjusts to a real body. Make the sky-blue pair first, live in them for a summer, and let the stripes, scallops and Bermudas follow. When the heat breaks, the same cotton and hook make a pair of cozy crochet house slippers for the other end of the day — or a set of breathable crochet summer blanket patterns for the sofa you land on.