
Interlaced Braid Stitch Crochet Pattern: A Woven-Look Stitch in 6 Steps
Some stitches decorate a surface; this one appears to weave it. The interlaced braid stitch crochet pattern builds three slim panels of front post stitches across a flat double crochet ground, then crosses the panels over each other in turn — left panel one row, centre panel the next — so the raised strands pass over and under exactly like the strands of a plaited braid. There is no sewing, no surface work and nothing added afterwards: the braid grows straight out of the fabric as you crochet. This tutorial teaches the stitch on a clearly counted swatch, with 36 stitches in every single row from the first to the last, so you always know where you stand. If you enjoy stitches that fake a woven surface, it sits beautifully beside the braid puff stitch crochet pattern, which leans its texture instead of crossing it.
What You Need
- Worsted weight (weight 4) yarn: approximately 150 yards (137 m) for the swatch in one colour — a single 100 g ball is plenty, with a little left over for the edging
- Optional second colour: approximately 80 yards (73 m) if you work the two-tone version described in Step 5
- 5.5 mm (US I-9) crochet hook
- Locking stitch markers
- Yarn needle and scissors
- Blocking mats and rustproof pins
Choose a smooth, firmly twisted yarn with a clean surface — cables and crossings disappear into fluffy or haloed yarns, while a plain acrylic or acrylic-wool blend shows every strand of the braid. If you substitute yarns, the free Craft Yarn Council yarn weight standards confirm what counts as a weight 4 yarn and the hook range that usually suits it. A light, solid colour reads best for a first swatch; save heathers and variegated yarns until your hands know the crossings.
Useful Materials from Amazon
A smooth worsted acrylic is the kindest yarn for learning crossings: the post stitches slide without splitting, the braid stands up crisply, and a whole practice swatch costs very little. One 100 g ball in a pale solid colour is all this swatch needs.

- Premium Quality Yarn: Crafted from durable acrylic fiber; each skein delivers consistent texture and strength for croche…
- Worsted Weight Size 4: This medium weight yarn works perfectly for afghans, scarves, hats, and sweaters; compatible with…
- Soft and Comfortable: Gentle on hands during extended crafting sessions; creates cozy blankets and wearables; features s…
Crossing front post stitches means pulling loops around the posts of stitches below, dozens of times per panel. A 5.5 mm ergonomic hook with a soft grip and a smooth throat makes those long reaches far kinder on your wrist than a slim metal hook.

- Easy grip handle
- Amour means love
- Love crochet
The first and last stitches of a post row love to hide under the raised braid. Clipping a locking stitch marker into each edge stitch at the start of every crossing row keeps your count of 36 honest without any squinting or recounting.
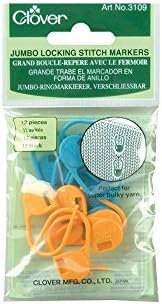
- CLOVER-Jumbo Locking Stitch Markers. Use these handy little tools for marking positions of knitted stitches
- Caution: Keep marker in locked position when not in use
- Material: Polyacetal
Post stitch fabric curls at the sides and pulls in slightly where the panels cross. A set of interlocking foam blocking mats with rustproof pins lets you pin the swatch out square, so the braid columns settle into straight, even lines.

- WHAT YOUR PURCHASE COMES WITH: 9 premium EVA blocking boards (12.6″ × 12.6″ × 0.75″), 150 rust-resistant T-pins, a gray …
- EASY TO USE & CARE: Made from durable extra-thick EVA foam, each board holds pins securely and stays firmly in place. Th…
- INTERLOCKING & EXPANDABLE SET: Interlocking tiles create a stable 36″ × 36″ blocking surface or can be arranged in any s…
Pattern Essentials
Skill level: Intermediate — you should be comfortable with double crochet and ready to work around the post of a stitch. The two crossings are explained in full below.
Gauge: 14 double crochet stitches and 8 rows = 4 inches (10 cm) in double crochet. One 4-row pattern repeat measures approximately 2 inches (5 cm) tall.
Finished measurements: Swatch approximately 10 × 7 inches (25 × 18 cm) after blocking, including the edging.
Stitch multiple: The braid panel is 12 stitches wide. The swatch adds 12 background stitches on each side (a multiple of 4, so you can widen or narrow the ground by 4 stitches at a time): 12 + 12 + 12 = 36 stitches.
Abbreviations (US terms):
- ch = chain
- dc = double crochet
- FPdc = front post double crochet (defined in Step 2)
- FC = front cross (defined in Step 3)
- BC = back cross (defined in Step 3)
- sc = single crochet
- st(s) = stitch(es)
- yo = yarn over
- rep = repeat
Important note: The turning chain (ch 2) does not count as a stitch anywhere in this pattern. Work the first stitch of every row into the first stitch of the row below, and the last stitch into the last stitch — never into the turning chain. Every row ends with exactly 36 stitches.
Interlaced Braid Stitch Crochet Pattern: Step by Step
Step 1: Foundation Chain and Setup Row

Foundation chain: Chain 38.
Row 1: Double crochet in the 3rd chain from the hook (the 2 skipped chains do not count as a stitch) and in each chain across, chain 2, turn. (36 dc)
Take a moment to count: 38 chains minus the 2 skipped at the start leaves exactly 36 double crochet. This row is the flat ground everything stands on. The middle 12 stitches of this row — stitches 13 to 24 — are where the braid panel will rise, and the 12 stitches on either side stay flat double crochet for the whole swatch. If your count is not 36 now, fix it before going on; every crossing that follows is counted from these stitches.
Step 2: The First Post Row

First, the stitch that builds the braid: FPdc (front post double crochet) = yarn over, insert your hook from front to back to front again around the post of the next stitch (passing behind the post so the stitch is pushed towards you), yarn over and pull up a loop, then finish the double crochet as normal — yarn over, pull through 2 loops, yarn over, pull through 2 loops. Working around the post pulls that stitch forward, so it stands up from the surface in a raised rib.
Row 2: Chain 2, turn. Double crochet in the first 12 stitches, FPdc in each of the next 12 stitches, double crochet in the last 12 stitches. (36 sts)
Push the background double crochet gently backwards as you go and the panel steps forward in one clean band. Look at the back of the work too: the panel stitches leave a neat channel behind them, and it is into the posts of this row that your crossings will reach in Step 3. Count again — 12 flat, 12 raised, 12 flat.
Step 3: The First Crossing Row — The Outer Panels Cross

The 12 panel stitches divide into three sub-panels of 4: call them A (stitches 13–16), B (17–20) and C (21–24). The crossings swap the halves of a sub-panel:
FC (front cross) over 4 stitches: Skip the next 2 stitches. FPdc in each of the next 2 stitches. Working in front of the two stitches just made, FPdc in each of the 2 skipped stitches. The second pair lies across the front of the first pair, so the strand leans left over right.
BC (back cross) over 4 stitches: Skip the next 2 stitches. FPdc in each of the next 2 stitches. Working behind the two stitches just made, FPdc in each of the 2 skipped stitches. Reach around the back of the work with your hook; the second pair passes behind, so the strand leans right over left — the mirror image of the front cross.
Row 3: Chain 2, turn. Double crochet in the first 12 stitches. Work FC over sub-panel A (the next 4 stitches). FPdc in each of the next 4 stitches (sub-panel B, plain). Work BC over sub-panel C (the next 4 stitches). Double crochet in the last 12 stitches. (36 sts)
Each cross still makes exactly 4 stitches — nothing is increased or lost, the pairs simply swap places. The outer panels now lean towards each other across the plain centre panel, and the interlace has begun. If a cross feels tight, you are not doing anything wrong: crossed post stitches are naturally snug, and the next row loosens them.
Step 4: Post Row, Then the Centre Panel Crosses

Row 4: Repeat Row 2 — double crochet in the first 12 stitches, FPdc in each of the next 12 stitches, double crochet in the last 12 stitches. (36 sts)
Work each FPdc around the post directly below it, following the crossed strands where they lie — do not try to un-twist them back into straight columns. This plain post row locks the crossings, sets the strands at their angle, and gives you a calm, countable row before the next cross.
Row 5: Chain 2, turn. Double crochet in the first 12 stitches. FPdc in each of the next 4 stitches (sub-panel A, plain). Work FC over sub-panel B (the next 4 stitches). FPdc in each of the next 4 stitches (sub-panel C, plain). Double crochet in the last 12 stitches. (36 sts)
Now the centre strand has crossed over the space between the two outer panels — over, under, over — and the braid reads as a true interlace rather than two separate cables. That alternation is the whole secret of this interlaced braid stitch crochet pattern: the panels take turns crossing, so the eye follows each strand weaving through the others.
Step 5: Repeating to Size — and Reading Your Braid

The pattern repeat is Rows 3 to 6, where Row 6 is another plain post row worked exactly as Row 2:
- Row 6: Repeat Row 2. (36 sts)
- Then repeat Rows 3, 4, 5 and 6 in order — outer panels cross, post row, centre panel crosses, post row.
For the swatch, work Rows 1 and 2, then Rows 3–6 three times, finishing with one more plain post row (Row 2) so the top of the braid ends level — 15 rows in total, about 7 inches (18 cm) tall before edging. Count the edge stitches on every crossing row (the markers earn their keep here), and read the braid as you go: above a crossing of sub-panel A, the next crossing you meet should belong to sub-panel B. If two crossings in the same sub-panel stack directly on top of each other, a post row went missing — the fix is always one row back, never more.
Two-tone version: Change colour at the end of every post row, working the last yarn over of the final double crochet with the new colour. One colour for the outer-cross rows and a second for the centre-cross rows makes the weaving impossible to miss, and the strands read like two ribbons plaited together.
Using the panel in a project: Keep the 12-stitch panel exactly as written and change only the background. Add stitches in multiples of 4 on either side to centre the braid on a cushion front, or work three panels side by side — background 8, panel 12, background 8, panel 12, background 8, panel 12, background 8 (68 stitches) — for a richly braided scarf. Texture lovers can pair it with the raised loops of the cupcake stitch crochet pattern or the plump clusters of the flower puff stitch crochet pattern in the same project for a sampler-style blanket.
Step 6: Edging, Blocking and Care

An edging squares the swatch and stops the sides curling. With the main colour, join yarn in any corner and work one round of single crochet: 1 single crochet in each stitch along the top and bottom edges (36 per side), 2 single crochet into the end of each double crochet row along the sides (15 rows = 30 per side), and 3 single crochet in each corner so the corners turn flat. Join with a slip stitch to the first single crochet, fasten off and weave in the ends.
To block, soak the piece in lukewarm water for 15 minutes, press the water out in a rolled towel without wringing, then pin it to 10 × 7 inches (25 × 18 cm) on blocking mats, gently pulling the background flat so the braid panels stand proud. Leave until completely dry. For acrylic yarn, a careful steam held just above the surface — never touching the fibres — sets the crossings permanently instead. The finished fabric is dense, warm and almost double-sided in its texture: use it for cushion fronts, bag panels, scarf centres and blanket strips anywhere you want a woven look without picking up a loom.
Final Thoughts
Crossed post stitches reward a slow first panel: define the front cross and back cross carefully in Step 3, keep every row at 36 stitches, and the interlace almost works itself. Once your hands know the rhythm, this is a wonderfully meditative stitch — flat row, raised row, cross, rest. For more fabrics that play tricks on the eye, the honeycomb stitch crochet pattern builds a deep cellular texture from plain stitches worked into rows below.