Christmas Amigurumi Gingerbread Man: A Complete Crochet Pattern
A plump, cuddly crocheted gingerbread man with white “icing” cuffs, gumdrop buttons, a rosy smile and a little bow tie. Beginner-friendly, worked entirely in continuous spiral rounds.
Introduction

Nothing smells or feels more like Christmas than gingerbread, and nothing is easier to keep than a crocheted version that never crumbles. This amigurumi gingerbread man has a big round head, a soft pear-shaped body and sturdy little arms and legs. The “icing” is simply embroidered on afterwards, which means you can decorate yours however you like.
Every piece is built from simple shapes (spheres and tubes), so if you can make a magic ring, single crochet, increase and decrease, you can finish this in one or two evenings. Use him as a mantel decoration, a gift topper, a stocking-filler or a present for a child (embroider the eyes if the toy is for a child under 3).
This article gives you the materials, gauge, a detailed pattern for every part, assembly instructions, decorating ideas and troubleshooting tips.
Looking for another festive project to go with it? Try our Christmas Amigurumi Reindeer: A Complete Crochet Pattern, which uses the same basic stitches and shaping.
Finished Size
Approximately 15 cm (6 in) tall when sitting and about 8 cm (3 in) wide at the head, using worsted-weight yarn and a 3.0 mm hook. Use thinner yarn and a smaller hook for a mini version or chunkier yarn for a bigger one.
Materials
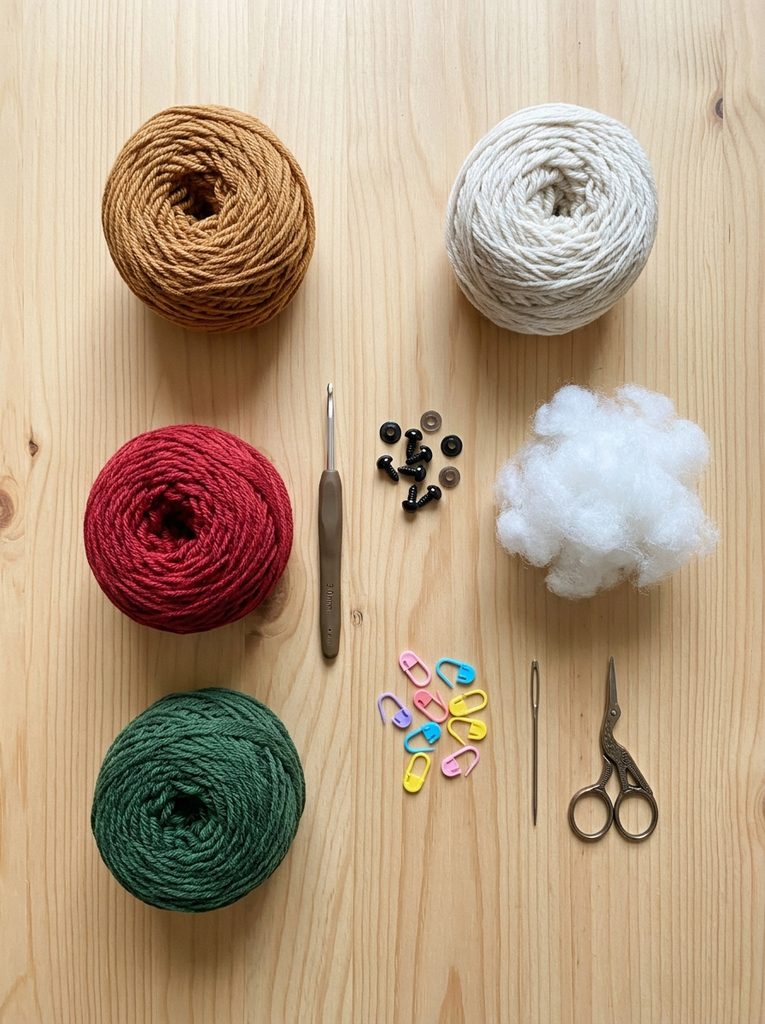
Yarn (worsted weight / Aran, cotton or acrylic; approximate amounts)
- Gingerbread brown (a warm tan or caramel): about 60 g (110 m)
- White or cream: about 10 g (18 m) – icing embroidery
- Red: about 8 g (14 m) – buttons and optional bow tie
- Green: about 8 g (14 m) – buttons and optional bow tie
- Dark brown or black embroidery thread – smile
Tools
- 3.0 mm crochet hook (use a hook 1 to 1.5 mm smaller than the yarn label suggests so the fabric is tight and the stuffing does not show)
- A pair of 8 mm black safety eyes (or black thread for embroidered eyes)
- Polyester fibre-fill
- Stitch marker
- Tapestry (yarn) needle
- Sharp scissors
- Pins (optional, for positioning parts before sewing)
- Pink blush or pink embroidery thread for cheeks (optional)
Abbreviations (US terms)
- MR – magic ring (magic circle)
- sc – single crochet
- inc – increase: 2 sc in the same stitch
- dec – invisible decrease: insert the hook into the front loop only of the next 2 stitches, yarn over, pull through both loops, yarn over, pull through the remaining 2 loops
- BLO – back loop only
- ch – chain
- sl st – slip stitch
- st(s) – stitch(es)
- FO – fasten off
- ( ) x N – repeat the instructions inside the brackets N times
- [ ] – number of stitches at the end of the round
General Notes
- Everything except the bow tie is worked in a continuous spiral. Do not join rounds and do not turn. Mark the first stitch of each round with a stitch marker and move it up as you go.
- Crochet tightly. Stuffing should not peek through the stitches.
- Stuff each piece as you go, before the opening becomes too small.
- Leave a long tail (about 30 cm / 12 in) on every piece you will sew on.
- Count your stitches at the end of each round. Mistakes caught early are easy to fix.
Pattern
1. Head (gingerbread brown)
The head is a wide, round sphere, just like a freshly baked cookie face.
- R1: MR, 6 sc [6]
- R2: inc x 6 [12]
- R3: (1 sc, inc) x 6 [18]
- R4: (2 sc, inc) x 6 [24]
- R5: (3 sc, inc) x 6 [30]
- R6: (4 sc, inc) x 6 [36]
- R7: (5 sc, inc) x 6 [42]
- R8 to R14: sc in each st around [42] (7 rounds)
Eyes: Insert the safety eyes between R10 and R11, about 8 stitches apart (leave 8 stitches between them). Secure the washers on the inside now, before you close up the head.
- R15: (5 sc, dec) x 6 [36]
- R16: (4 sc, dec) x 6 [30]
Start stuffing firmly.
- R17: (3 sc, dec) x 6 [24]
- R18: (2 sc, dec) x 6 [18]
Add more stuffing until the head is round and full.
- R19: (1 sc, dec) x 6 [12]
- R20: dec x 6 [6]
FO. Thread the tail through the front loops of the remaining 6 stitches, pull tight to close, and weave in the end.
2. Body (gingerbread brown)
A soft pear shape, narrower at the neck.
- R1: MR, 6 sc [6]
- R2: inc x 6 [12]
- R3: (1 sc, inc) x 6 [18]
- R4: (2 sc, inc) x 6 [24]
- R5: (3 sc, inc) x 6 [30]
- R6: (4 sc, inc) x 6 [36]
- R7 to R10: sc in each st around [36] (4 rounds)
- R11: (4 sc, dec) x 6 [30]
- R12: (3 sc, dec) x 6 [24]
- R13 to R14: sc in each st around [24] (2 rounds)
- R15: (2 sc, dec) x 6 [18]
Stuff the body firmly, adding the stuffing in small pieces to get a smooth shape. FO leaving a long tail. Do not close the hole; you will sew this opening to the head.
3. Arms (make 2, gingerbread brown)
- R1: MR, 6 sc [6]
- R2: (1 sc, inc) x 3 [9]
- R3 to R10: sc in each st around [9] (8 rounds)
Stuff the arm firmly up to about three-quarters of its length (arms should stand out slightly, as on a real gingerbread man). FO leaving a long tail, and flatten the open end for sewing.
4. Legs (make 2, gingerbread brown)
- R1: MR, 6 sc [6]
- R2: inc x 6 [12]
- R3: (1 sc, inc) x 6 [18]
- R4: BLO sc in each st around [18] (this makes a neat, flat edge for the sole)
- R5 to R7: sc in each st around [18] (3 rounds)
- R8: (4 sc, dec) x 3 [15]
- R9 to R10: sc in each st around [15] (2 rounds)
Stuff firmly. FO leaving a long tail.
5. Buttons (make 3; 1 red, 1 green, 1 red)
- R1: MR, 6 sc [6]
- sl st into the first sc to join.
FO leaving a long tail. Pull the magic ring very tight so the button is a flat, round disc.
For larger gumdrop-style buttons: work R2 as inc x 6 [12], join with a sl st and FO, then stitch them on slightly higher up.
6. Bow Tie (green or red)
This one is worked flat, in rows.
- Foundation: ch 9
- Row 1: sc in the 2nd ch from the hook and in each ch across, ch 1, turn [8]
- Rows 2 to 6: sc in each st across, ch 1, turn [8]
- Row 7: sc in each st across [8]
FO, leaving a tail of about 20 cm (8 in). Fold the rectangle so the short edges meet in the centre, then wrap the tail tightly around the middle 3 to 4 times, pulling to create the bow shape. Secure with a few stitches and keep the remaining tail for sewing it to the neck.
Icing and Face Embroidery
The embroidery is what turns a plain brown figure into a gingerbread man. Do it after assembly so you can see how everything sits.
- Smile. With dark brown or black thread, embroider a small curved smile about 3 to 4 rounds below the eyes, between them. Make it about 5 stitches wide.
- Cuffs on arms and legs. With white yarn and a tapestry needle, embroider a zigzag “icing” line around each wrist (about 2 rounds from the end of the arm) and each ankle (about 2 rounds above the sole). Use 6 to 8 small V-shaped stitches around each limb.
- Icing outline (optional). Stitch a wavy white line along the top of the head, the bottom of the body or both sides of the arms, using small running stitches to imitate piped icing.
- Cheeks. Brush pink blush on each cheek, or stitch two small pink horizontal stitches below the eyes.
- Eyebrows (optional). Add two short white stitches above the eyes for a cheeky expression.
Assembly
Use pins to check the placement before sewing. Sew with small, tight stitches through both pieces.
- Body to head. Place the open 18-stitch edge of the body against the underside of the head, centred, and whip stitch all the way around. Add a little extra stuffing before you close the last stitches.
- Arms. Sew the arms to the sides of the body at about R12, angled slightly upward. Attach the flat open end firmly.
- Legs. Sew the open end of each leg to the bottom of the body, around R4 to R5, with a gap of 2 to 3 stitches between them so he sits steadily.
- Buttons. Stitch the three buttons in a vertical line down the centre front of the body, at about R5, R8 and R11, with the colours alternating red, green, red.
- Bow tie. Sew the bow tie at the neck, centred, over the join between head and body.
- Embroidery. Add the smile, icing cuffs and optional details described above.
Weave in all remaining ends.
Tips for a Great Finish
- Invisible decreases. Working through the front loops gives a much smoother surface.
- Round head. Over-stuff slightly, then roll the head between your palms to even it out.
- Neat icing. Draw the embroidery path with a water-soluble pen first, or use pins as guides.
- Matching limbs. Count rounds when sewing the arms and legs so both sides match.
- Hiding yarn tails. Pull each tail through the toy before cutting so the end vanishes inside.
- Safety. For babies and toddlers, embroider the eyes, keep the buttons securely sewn on and check all seams regularly.
Variations
- Gingerbread girl. Add a small bow made with the bow-tie pattern (cut the rows to 5 for a smaller version) on the top of the head, and a white embroidered skirt line at the waist.
- Tree ornament. Skip the legs, make the body slightly smaller and sew a ribbon loop to the top of the head.
- Candy-cane scarf. Crochet a narrow strip in red and white stripes and wrap it around the neck instead of the bow tie.
- Mini batch. With DK yarn and a 2.5 mm hook you will get a gingerbread man of about 11 to 12 cm; with chunky yarn and a 4.5 mm hook he will be about 22 cm.
- Colour palettes. Try a darker chocolate-brown gingerbread, or pastel icing colours for a modern look.
Troubleshooting
The head looks flat. Add more stuffing before the last 3 rounds and shape the head gently with your hands.
There are gaps between the stitches. Go down a hook size and keep your yarn tension firm.
The arms flop. Stuff them more firmly, and sew the arms on at a slight upward angle with a few extra stitches.
He will not sit up. Check that the legs are level and the body is stuffed well. Adding a small fabric pouch of poly pellets in the base of the body helps (not suitable for small children).
Care
Spot-clean with a damp cloth and mild soap. Air-dry away from direct heat. If you used acrylic yarn, avoid hot irons or radiators, which can melt the fibres.
Final Thoughts
This little gingerbread man is quick to make, easy to personalize and always a hit. Make a whole gingerbread family for the Christmas table, or a single one as a special gift. Happy crocheting, and Merry Christmas!
Want a complete Christmas set? Pair him with the Christmas Amigurumi Reindeer so your mantel has two friends instead of one.
Pattern notes: This pattern is for personal use. If you sell finished items, please credit the pattern designer and make the toy yourself.