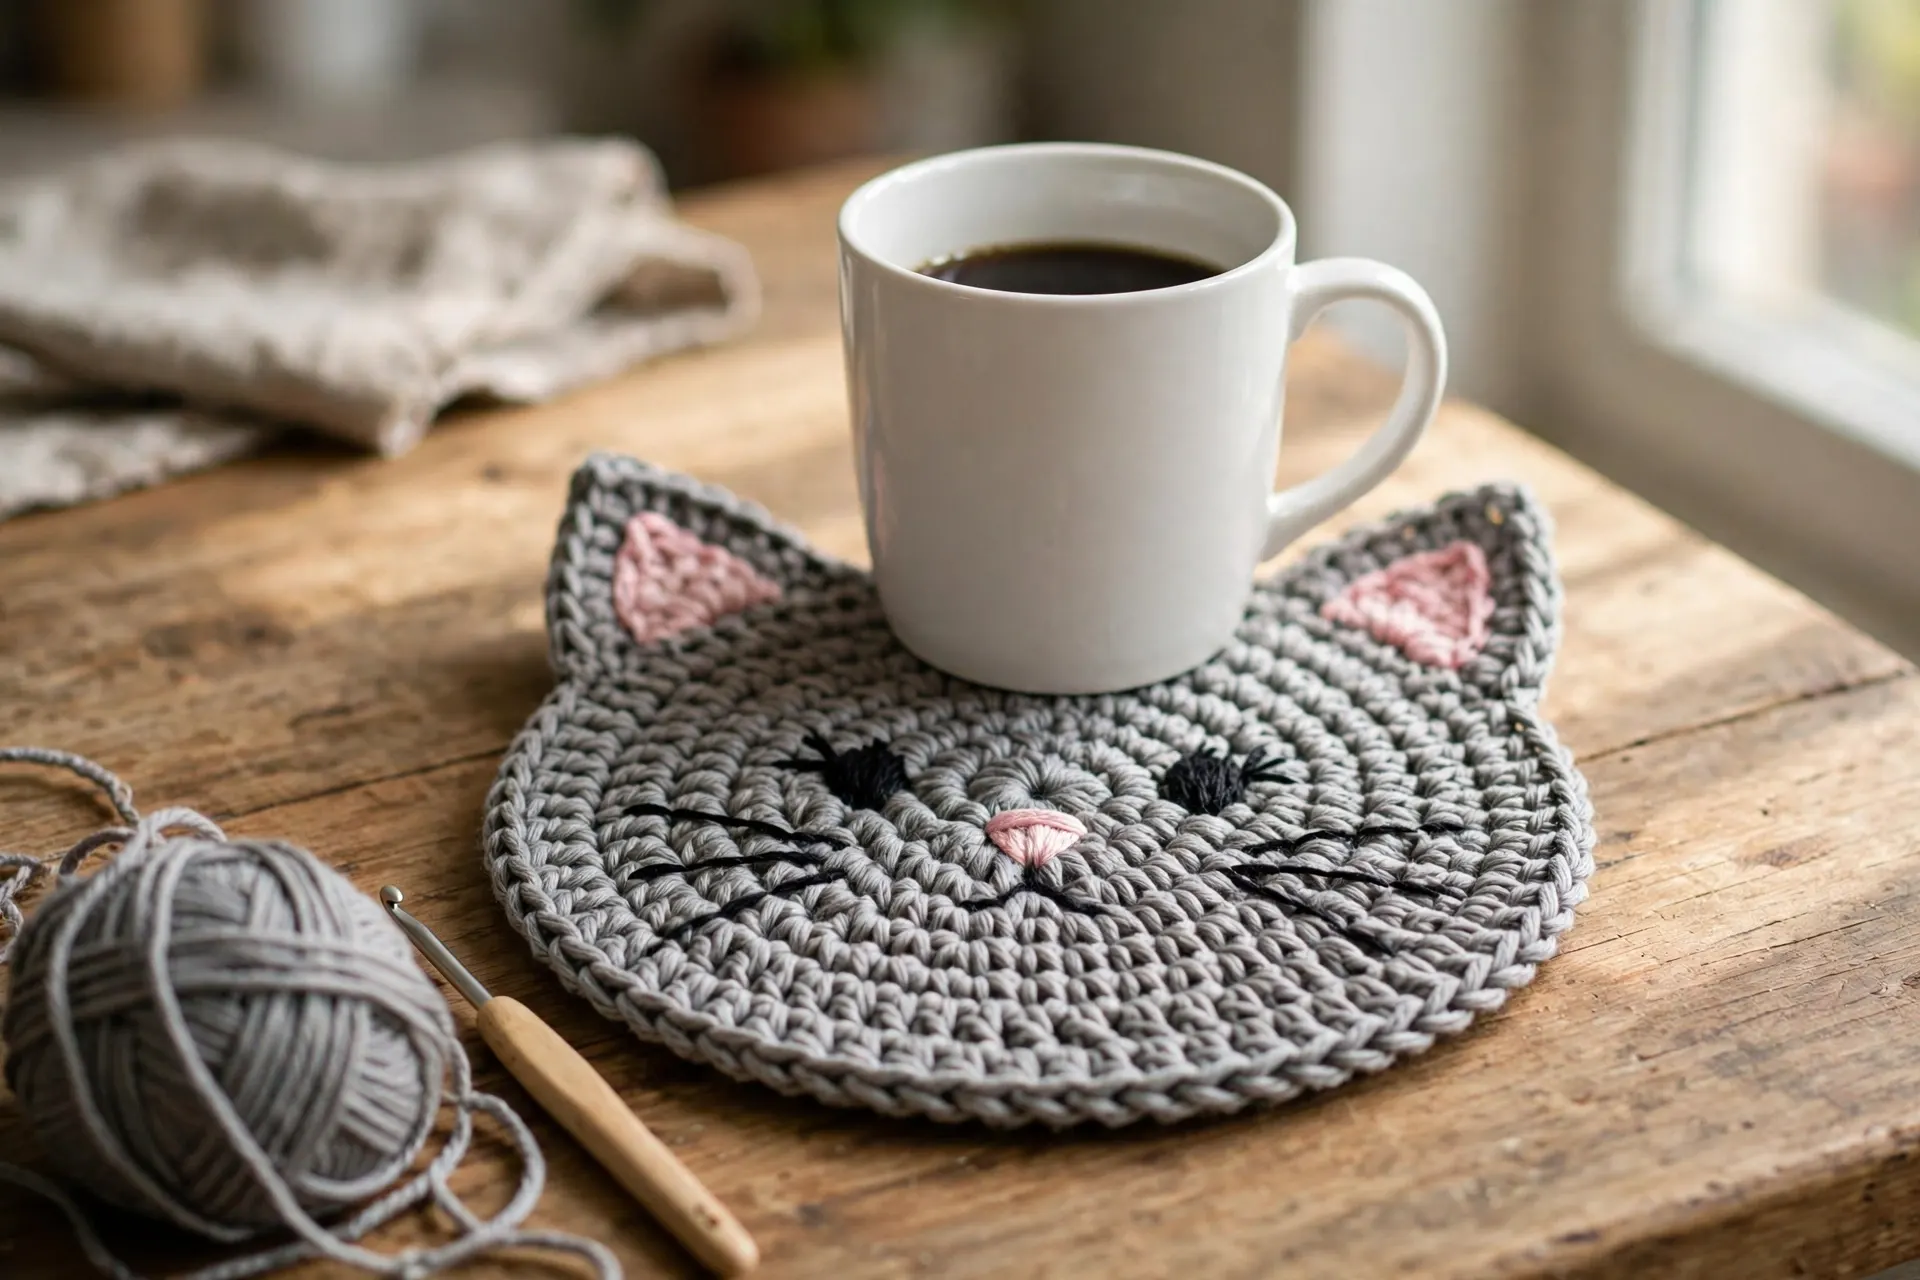
Cat Coasters Crochet Free Pattern: The Quick Crochet Project Every Cat Lover Ends Up Making
Some crochet projects ask for a free weekend and a bag of yarn; a cat coaster asks for a scrap ball and half an hour. This cat coasters crochet free pattern gives you one complete cat, written out stitch by stitch: a flat grey tabby face in spiral single crochet rounds, two pointed ears with pink inner ears, and an embroidered face that turns a plain circle into a cat. Every round carries its exact stitch count, so the coaster comes out flat and the same size every time, and the kitten and jumbo sizes at the end of this cat coasters crochet free pattern are just a change of numbers.
Why You Will Love This Cat Coasters Crochet Free Pattern
- It is a true one-sitting project. Most crocheters finish one in 25 to 40 minutes, ears and face included — a set of four is an easy evening.
- It uses one main stitch. Plain single crochet builds everything; the only extras are an increase, two easy decreases and simple embroidery.
- It eats scraps beautifully. About 35 yards of grey cotton per coaster — the tail end of a dishcloth ball is plenty.
- It actually protects the table. Cotton absorbs condensation and gives hot mugs a washable barrier that acrylic cannot match.
- It gifts itself. A stack of four tied with twine is a housewarming or cat-sitter thank-you present people genuinely use daily.
Materials and Tools
What You Need
- Worsted weight (size 4) 100% cotton yarn in grey — approx. 35 yd (32 m) per coaster
- Worsted weight (size 4) cotton yarn in pink — approx. 6 yd (5.5 m) per coaster, for the inner ears and nose
- A small amount of black yarn or embroidery thread for the face
- 4.0 mm (US G-6) crochet hook
- Tapestry (yarn) needle, for sewing and embroidery
- Stitch marker
- Scissors
If yarn weight labels are new to you, the Craft Yarn Council’s standard yarn weight system explains what the “4” on a cotton ball band means. Cotton is the right fibre here: it absorbs drips, tolerates hot mugs and washes clean — the same kitchen cotton you would choose for our crochet dishcloth patterns.
Gauge: 16 sc and 18 rows = 4 in (10 cm); the finished size is built from it, so check your swatch in Step 1.
Finished size: the round face measures approx. 3¾ in (9.5 cm) across; with the ears the coaster stands approx. 4¾ in (12 cm) tall.
Abbreviations (US Terms)
- MR = magic ring
- ch = chain
- sl st = slip stitch
- sc = single crochet
- inc = increase (2 sc worked into the same stitch)
- sc2tog = single crochet 2 together (decrease)
- sc3tog = single crochet 3 together (decrease)
- st(s) = stitch(es)
- rep = repeat
The Cat Coasters Crochet Free Pattern, Step by Step
Here is the complete cat coasters crochet free pattern, worked from the centre of the face outward. The face is a seven-round spiral circle growing by 8 stitches a round to 48; the ears are two small counted triangles worked in rows; the face is embroidered at the end, which is where the cat appears. Every round ends with its count in brackets. Love a themed table set? Our egg coaster crochet pattern is this coaster’s natural breakfast partner.
Step 1 — Gather Your Materials and Check Your Tension

Lay everything out first: the face is quick, and nothing breaks the rhythm like hunting for the needle mid-cat. If your tension is untested, swatch: chain 18, work 10 rows of single crochet, and measure the middle — you want 16 stitches and 18 rows inside 4 in (10 cm). Too many stitches means a small coaster; too few, a big one. Change hook size, not counts.
Step 2 — Start the Face (Rounds 1–2)

With grey yarn, make a magic ring. The face is worked in a continuous spiral — do not join rounds; mark the first stitch of each round and move the marker up as you go.
Round 1: Work 8 sc into the ring. Pull the tail to close the ring completely. (8 sc)
Round 2: Work 2 sc in every stitch around. (16 sc)
You should have a small, flat grey disc with no hole in the middle; if a gap remains, tug the ring tail again after the next round.
Step 3 — Grow the Face (Rounds 3–4)

Round 3: Sc in the next st, 2 sc in the next st; rep from * to * around. (24 sc)
Round 4: Sc in each of the next 2 sts, 2 sc in the next st; rep from * to * around. (32 sc)
The circle grows by exactly 8 stitches a round — one increase per repeat, eight repeats per round. After Round 4 it should measure about 2½ in (6.5 cm) across and lie flat under your palm.
Step 4 — Finish the Round Face (Rounds 5–7)

Round 5: Sc in each of the next 3 sts, 2 sc in the next st; rep from * to * around. (40 sc)
Round 6: Sc in each of the next 4 sts, 2 sc in the next st; rep from * to * around. (48 sc)
Round 7: Sc in every st around. (48 sc)
Slip stitch into the next stitch to smooth the edge, then fasten off. Your circle should measure about 3¾ in (9.5 cm) across — that follows straight from the count: 48 stitches at 4 stitches per inch make a 12 in (30.5 cm) circumference, and 12 divided by pi gives the diameter. This plain round firms the edge.
Step 5 — Crochet the Ears (Make 2)

Each ear is a small grey triangle worked in rows, wide at the base and closing to a single stitch at the tip. Ch 1 at the end of each row and turn; the turning chain does not count as a stitch.
Row 1: Ch 8. Sc in the 2nd ch from the hook and in each ch across. (7 sc)
Row 2: Sc in every st across. (7 sc)
Row 3: Sc2tog, sc in each of the next 3 sts, sc2tog. (5 sc)
Row 4: Sc in every st across. (5 sc)
Row 5: Sc2tog, sc in the next st, sc2tog. (3 sc)
Row 6: Sc3tog. (1 sc)
Fasten off, leaving a long tail for sewing. Check the first ear’s shape: the decreases step the sides in evenly — 7, 7, 5, 5, 3, 1 — tapering in clean stages, about 1¾ in (4.5 cm) wide at the base and 1⅓ in (3.4 cm) tall. Make the second ear the same way, in the same sitting if you can, so your tension matches.
Step 6 — Add the Inner Ears, Sew the Ears On and Embroider the Face

Inner ear (pink yarn, make 2):
Row 1: Ch 6. Sc in the 2nd ch from the hook and in each ch across. (5 sc)
Row 2: Sc2tog, sc in the next st, sc2tog. (3 sc)
Row 3: Sc3tog. (1 sc)
Fasten off, leaving a sewing tail. Centre one pink triangle on the front of each grey ear, its base one row above the ear’s base, and sew around its edges with small stitches — the grey should frame the pink on all three sides.
Attach the ears. Lay the face flat with the spiral’s end at the bottom — that is the chin. Pin the ears behind the top edge, one each side of the top centre stitch of Round 7: each ear’s base sits behind roughly 7 stitches of edge, with about 4 stitches of plain edge between the ears. Sew through the ear’s base row and the backs of the Round 7 stitches with the grey tail, twice across.
Embroider the face with black yarn or thread:
- Eyes: two vertical satin-stitch ovals over Rounds 4 and 5, about 8 stitches apart, centred over the nose.
- Nose: a small pink upside-down triangle over Rounds 2 and 3 at the centre, about 3 stitches wide, with one short stitch down from its point.
- Mouth: two tiny curves out and down from that centre stitch, like a small “w” under the nose.
- Whiskers: three straight stitches fanning out each side, from near the nose at Round 4 height, angling outward across Rounds 5 and 6.
- Tabby stripes: three short vertical stitches in darker grey across the forehead, over Rounds 6 and 7 between the ears.
Keep the stitches loose enough not to pucker the face.
Step 7 — Weave In, Block and Finish

Weave in every end on the back, running each tail through stitch backs in two directions so nothing creeps loose in the wash. Then block: lay the coaster face-up, spritz lightly with water, ease the circle round, straighten the ears and sharpen their tips, and leave it to dry flat. Blocking is the difference between a grey circle with ears and a coaster that sits dead flat under a glass.
Tips for a Flat Coaster and a Perky Cat
A few simple habits make every cat coasters crochet free pattern you work come out flatter and cuter:
- Count at the end of every round. The counts (8, 16, 24, 32, 40, 48, 48) are your checkpoints. One missed increase shows up two rounds later as a lopsided face.
- Keep the marker moving. In a spiral it is the only way to know where a round ends — move it up into the first stitch of every new round.
- Embroider before you block. The face is far easier to stitch on an unblocked circle; blocking afterwards settles any tiny puckers.
- Pin the ears before sewing. Check the cat face-on: ears level, equally spaced, tips at the same height. Thirty seconds of pinning saves a permanently surprised expression.
- Make sets in one sitting. Faces first, then ears, then embroider the whole litter in one session — tension and embroidery style stay consistent. The same batching makes our swirl crochet coaster sets evenly sized too.
Common Mistakes and How to Fix Them
- The face curls into a little bowl. A round grew by less than 8, or your tension tightened as you relaxed. Recount the ladder (16, 24, 32, 40, 48) and keep your grip even.
- The edge ruffles like lettuce. Extra increases have crept in — usually a repeat worked twice at the marker. Each round grows by exactly 8, never more.
- The ears lean or sit crooked. They were sewn by eye instead of by count. Unpick, re-pin by the Step 6 counts, and check face-on before finishing the seam.
- The embroidered face puckers. Stitches pulled too tight, or thread carried too far across the back. Keep floats short, loosen up, and let blocking settle the rest.
More Cat Coaster Ideas to Try
Once one tabby is on the table, the same counted circle grows a whole clowder of variations — and for a matching kitchen set, our can cozy crochet pattern uses the same cotton and base-circle maths.
Black Cat Coaster
- Construction: Work the hero pattern exactly as written — same 48-stitch face, same 7-stitch ears — in black cotton. Embroider the eyes in gold or green, skip the tabby stripes, and work the whiskers in light grey.
- Best yarn: Worsted cotton in true black; inner ears in charcoal grey instead of pink.
- Size: As the main pattern, about 3¾ in (9.5 cm) across. Difficulty: Beginner, though black stitches are harder to count — work in good light. Time: About 40 minutes.
- Tip: Count out loud on every round; in black yarn the marker does all the work.
Calico Cat Coaster
- Construction: Same counts, patched colours: Rounds 1–3 in cream, Rounds 4–6 in ginger, Round 7 back in cream, changing colour in the last stitch of the round before. One ear ginger, one ear brown-grey, both with pink inners; embroider as for the tabby.
- Best yarn: Worsted cotton scraps in cream, ginger and brown-grey.
- Size: As the main pattern. Difficulty: Beginner. Time: About 40 minutes.
- Tip: Weave colour-change tails in as you go; three colours make six tails.
Kitten Mini Coaster
- Construction: Stop the face after Round 4 and work one even round: 32 stitches, giving a face about 2½ in (6.5 cm) across at gauge — right for an espresso cup. For ears, work the pink inner-ear triangle (5 stitches closing to 1) in grey instead, and skip the insert.
- Size: About 2½ in (6.5 cm) across, 3¼ in (8.5 cm) tall with ears. Difficulty: Beginner. Time: About 20 minutes.
- Tip: A loop of chain stitched to the back turns a mini into a keyring or bag charm.
Jumbo Cat Mug Rug
- Construction: Keep climbing the ladder: Round 7: (5 sc, inc) rep around for 56 sc; Round 8: (6 sc, inc) rep around for 64 sc; Round 9: sc in every st (64 sc). At gauge that is a 16 in (40.5 cm) circumference — about 5 in (12.5 cm) across. Scale the ears up too: add one extra plain row after Row 2 of the ear (7, 7, 7, 5, 5, 3, 1 over 7 rows), and embroider the face bolder.
- Best yarn: Worsted cotton; the bigger face takes about 55 yd (50 m).
- Size: About 5 in (12.5 cm) across, 6¼ in (16 cm) tall with ears. Difficulty: Beginner. Time: About 1 hour.
- Tip: The jumbo fits a soup mug or a small plant pot — block it firmly so the bigger circle stays flat.
Frequently Asked Questions
What is the best yarn for a cat coasters crochet free pattern?
Worsted weight 100% cotton, every time. Cotton absorbs the condensation off a cold glass, tolerates hot mugs, holds a flat shape and washes clean. Acrylic lets moisture bead through to the table and can soften under a very hot dish.
How long does one cat coaster take to make?
About 25 to 40 minutes once you know the stitches, ears, sewing and embroidery included. Beginners should allow closer to an hour for the first one — the embroidery is the slow part, and it speeds up by cat two.
Why does my coaster not lie flat?
Almost always the counts: a round that grows by more or less than 8 stitches either ruffles or cups the circle. Recheck the ladder — 8, 16, 24, 32, 40, 48 — relax your tension, and block the finished coaster flat.
Can I make the coaster a different size?
Yes — the size is pure arithmetic. Grow the base with the same +8 ladder (each round adds 8 stitches, about ⅔ in / 1.7 cm of diameter) and finish with one even round. The kitten (32 stitches) and jumbo (64 stitches) versions above show both directions.
How do I wash crochet cat coasters?
Machine wash with similar colours on a gentle cycle and dry flat, reshaping the ears while damp. Cotton coasters improve with washing — the stitches settle flatter each time.
Final Thoughts
A counted circle, two triangles and a few embroidery stitches turn a scrap of grey cotton into a coaster that makes people smile before their coffee lands. Master this cat coasters crochet free pattern once and the whole litter follows: black cats for Halloween, calicos from the scrap bag, kittens for the espresso cups and a jumbo for the soup mug. Set one under the makes from our crochet coffee cup patterns, and expect every cat lover you know to put in an order.