Fan Stitch Crochet Pattern: An Elegant Shell Fan Tutorial in 6 Steps
Some stitches earn their place in your repertoire the moment you finish the first row. The fan stitch crochet pattern opens five double crochets out of a single stitch like a little hand fan, pins it down with one neat single crochet, and repeats — and within three rows you have a fabric of overlapping shells that looks far more complicated than it is. Learn the stitch on a small counted swatch here, then use it to make a soft baby blanket, with every row’s counts written out in full. This fan stitch crochet pattern is a satisfying first shell project.
What Is the Fan Stitch?
The fan stitch is a shell stitch pattern built from one repeated unit: a fan of 5 double crochet worked into one stitch, followed by a single crochet anchor worked into the stitch between the fans of the row below. Each new row places its fans into the anchors and its anchors into the centres of the fans below, so the fans stagger as the fabric grows — no fan sits directly on top of the one beneath it, which gives the finished cloth its woven, scalloped look.
It is a wonderfully versatile stitch. In cotton it makes firm, pretty dishcloths and market bags; in a soft acrylic or wool blend it drapes beautifully for scarves, shawls and blankets. If you enjoy learning a stitch properly and then putting it to work, our braid stitch slippers tutorial uses the same learn-it-then-make-it approach. This fan stitch crochet pattern is a favorite for gifts.
Materials and Gauge
The swatch needs only small amounts of yarn; blanket amounts are listed too.
- Worsted weight (#4) yarn: about 50 yd (46 m) for the swatch. For the blanket, approx. 900 yd (820 m) in total — about 600 yd soft lilac and 300 yd cream. A smooth acrylic or blend shows the fans best; avoid fuzzy yarn while you learn, because you need to see the centre stitch of every fan. If yarn labels are still a puzzle, the Craft Yarn Council’s standard yarn weight system explains what the “#4” on the band means.
- 5.0 mm (US H-8) crochet hook
- Stitch markers (optional, for marking fan centres at first)
- Tapestry needle, scissors and a tape measure
Gauge: 3 fans and 8 pattern rows = 7 × 6 in (18 × 15 cm), lightly blocked. Gauge is not critical for the blanket, but make the swatch anyway — it teaches your hands the rhythm and confirms your fan size before you commit to a full chain. Swatching first helps you learn this fan stitch crochet pattern.
Useful Materials from Amazon

- Content: 100% Acrylic. This yarn is great for knitting, crocheting, amigurumi and craft projects. Easy to care for: mach…
- Ball Size: 454g / 16 oz, 742 meters / 812 yards
- Gauge:#4 Worsted (Medium). Knitting Gauge: 4” x 4” (10 cm x 10 cm) 16 sts x 20 rows with 5 mm knitting needle ,Crochet G…
A smooth worsted acrylic keeps every fan crisp and identical, and one yarn line in two colours guarantees both colours work to exactly the same gauge.

- High Quality Material: Our hook head is made of high quality aluminum material, which is durable and not easy to break o…
- Ergonomic Design: Our crochet handles are ergonomically designed. The shape of the grip has been specially designed to a…
- Various Sizes Available: Our crochet hooks are approximately 5.9 inches in length. But we provide you with 9 different s…
Five double crochets into one stitch, hundreds of times over — a soft-grip 5 mm hook keeps your hand comfortable through the whole blanket.

- [150-Piece Value Set in 10 Colors] Get 150 locking stitch markers in 10 colors (15 per shade) to color-code rows, repeat…
- [Smooth Snag-Free Plastic] Lightweight smooth plastic with a gentle locking clasp slides along yarn without catching or …
- [Works for Knitting & Crochet] The slim profile slips onto standard knitting needles, while the secure locking ring mark…
Clip a marker into the centre stitch of each fan at first and the anchor points become impossible to miss; locking markers stay put in shell fabric.

- All IN ONE Tapestry Knitting Needle Set:The sewing darning needles set comes with 12 pieces of random colored bent tapes…
- Easy for Yarn threading:These knitting needles are designed with large eyes, and it’s convenient for threading yarn, eve…
- 2 Types Needles for Different Demands:The darning yarn needles set comes with colorful bent needles and blunt straight n…
A blunt, large-eye tapestry needle weaves the blanket’s ends invisibly along the backs of the fans.
Abbreviations (US Terms)
- ch = chain
- sc = single crochet
- dc = double crochet
- sl st = slip stitch
- st(s) = stitch(es)
- rep = repeat
One definition matters most in this fan stitch crochet pattern: a fan = 5 dc worked into the same stitch, and the anchor = the single crochet worked into the centre (3rd) dc of a fan, or into an anchor of the row below, as each row directs.
The Fan Stitch Crochet Pattern, Step by Step
Learn the stitch on the swatch in Steps 1–5 — chain 26, four fans wide — then work the blanket in Step 6. Every row ends with its counts, so you can check as you go.
Step 1 — Materials, Gauge and the Multiple

Gather your yarn and hook and remind yourself of the two building blocks before you chain a single stitch: one fan (5 dc into one stitch) and one anchor (1 sc). Each fan needs 6 foundation chains, plus 2 extra chains at the end of the row — chain 26 for the four-fan swatch, a multiple you will reuse for every project in this stitch: (6 × number of fans) + 2. Count the chain once more before you start; nearly every fan stitch problem is really a foundation chain problem.
Step 2 — Foundation and Set-Up Row

Row 1 (set-up row): Ch 26. Sc in the 2nd ch from the hook, *skip the next 2 ch, work 5 dc in the next ch (fan made), skip the next 2 ch, sc in the next ch; rep from * 3 more times. Turn. (4 fans and 5 sc — the sc sit in chains 2, 8, 14, 20 and 26; the fans sit in chains 5, 11, 17 and 23)
Read the row back before you turn: anchor, fan, anchor, fan — with two skipped chains hiding under each fan. Those skipped chains let the five doubles spread open instead of bunching. The fabric will look wavy and unimpressive at this point; that is normal. Row 2 is where the fans start to behave.
Step 3 — The Fan Row, Stitch by Stitch

Row 2: Ch 3 (counts as the first dc), work 2 dc in the first sc (a half fan of 3 dc — it keeps the edge straight), *sc in the centre (3rd) dc of the next fan, work 5 dc in the next sc; rep from * across, ending with sc in the centre dc of the last fan, then 3 dc in the last sc (second half fan). Turn. (3 full fans, 2 half fans and 4 sc — 25 sts in total)
Two things are happening in this row. Your single crochets land in the exact centre of each fan below, splitting it into two neat halves. And your new fans grow out of the old anchors — the single crochets of Row 1 — so this row’s fans sit in the gaps between last row’s fans. That offset is the whole secret of the fan stitch crochet pattern: fans never stack directly, they nestle.
Step 4 — The Offset/Anchor Row

Row 3: Ch 1, sc in the first dc, *work 5 dc in the next sc, sc in the centre (3rd) dc of the next fan; rep from * across, ending with sc in the top of the beginning ch-3 (the centre of the last half fan). Turn. (4 fans and 5 sc — 25 sts in total, exactly matching Row 1)
Now look at where the fans have landed. Row 3’s fans grow out of Row 2’s anchors, which sat in the centres of Row 1’s fans — so Row 3’s fans sit directly above Row 1’s fans, while Row 2’s fans fill the spaces between. The pattern is now a simple two-row repeat: repeat Rows 2 and 3 for the rest of the piece. Work your swatch to 9 rows in total, ending with a Row 3, and measure it. If your fans are far off the gauge, change hook size before the blanket.
Step 5 — Repeating and Changing Colours

Once the two-row repeat feels automatic, the only skill left is changing colour cleanly. Work the very last stitch of the row until two loops remain on your hook, yarn over with the new colour and pull through both loops. Turn and start the next row with the new colour — the join disappears into the stitch.
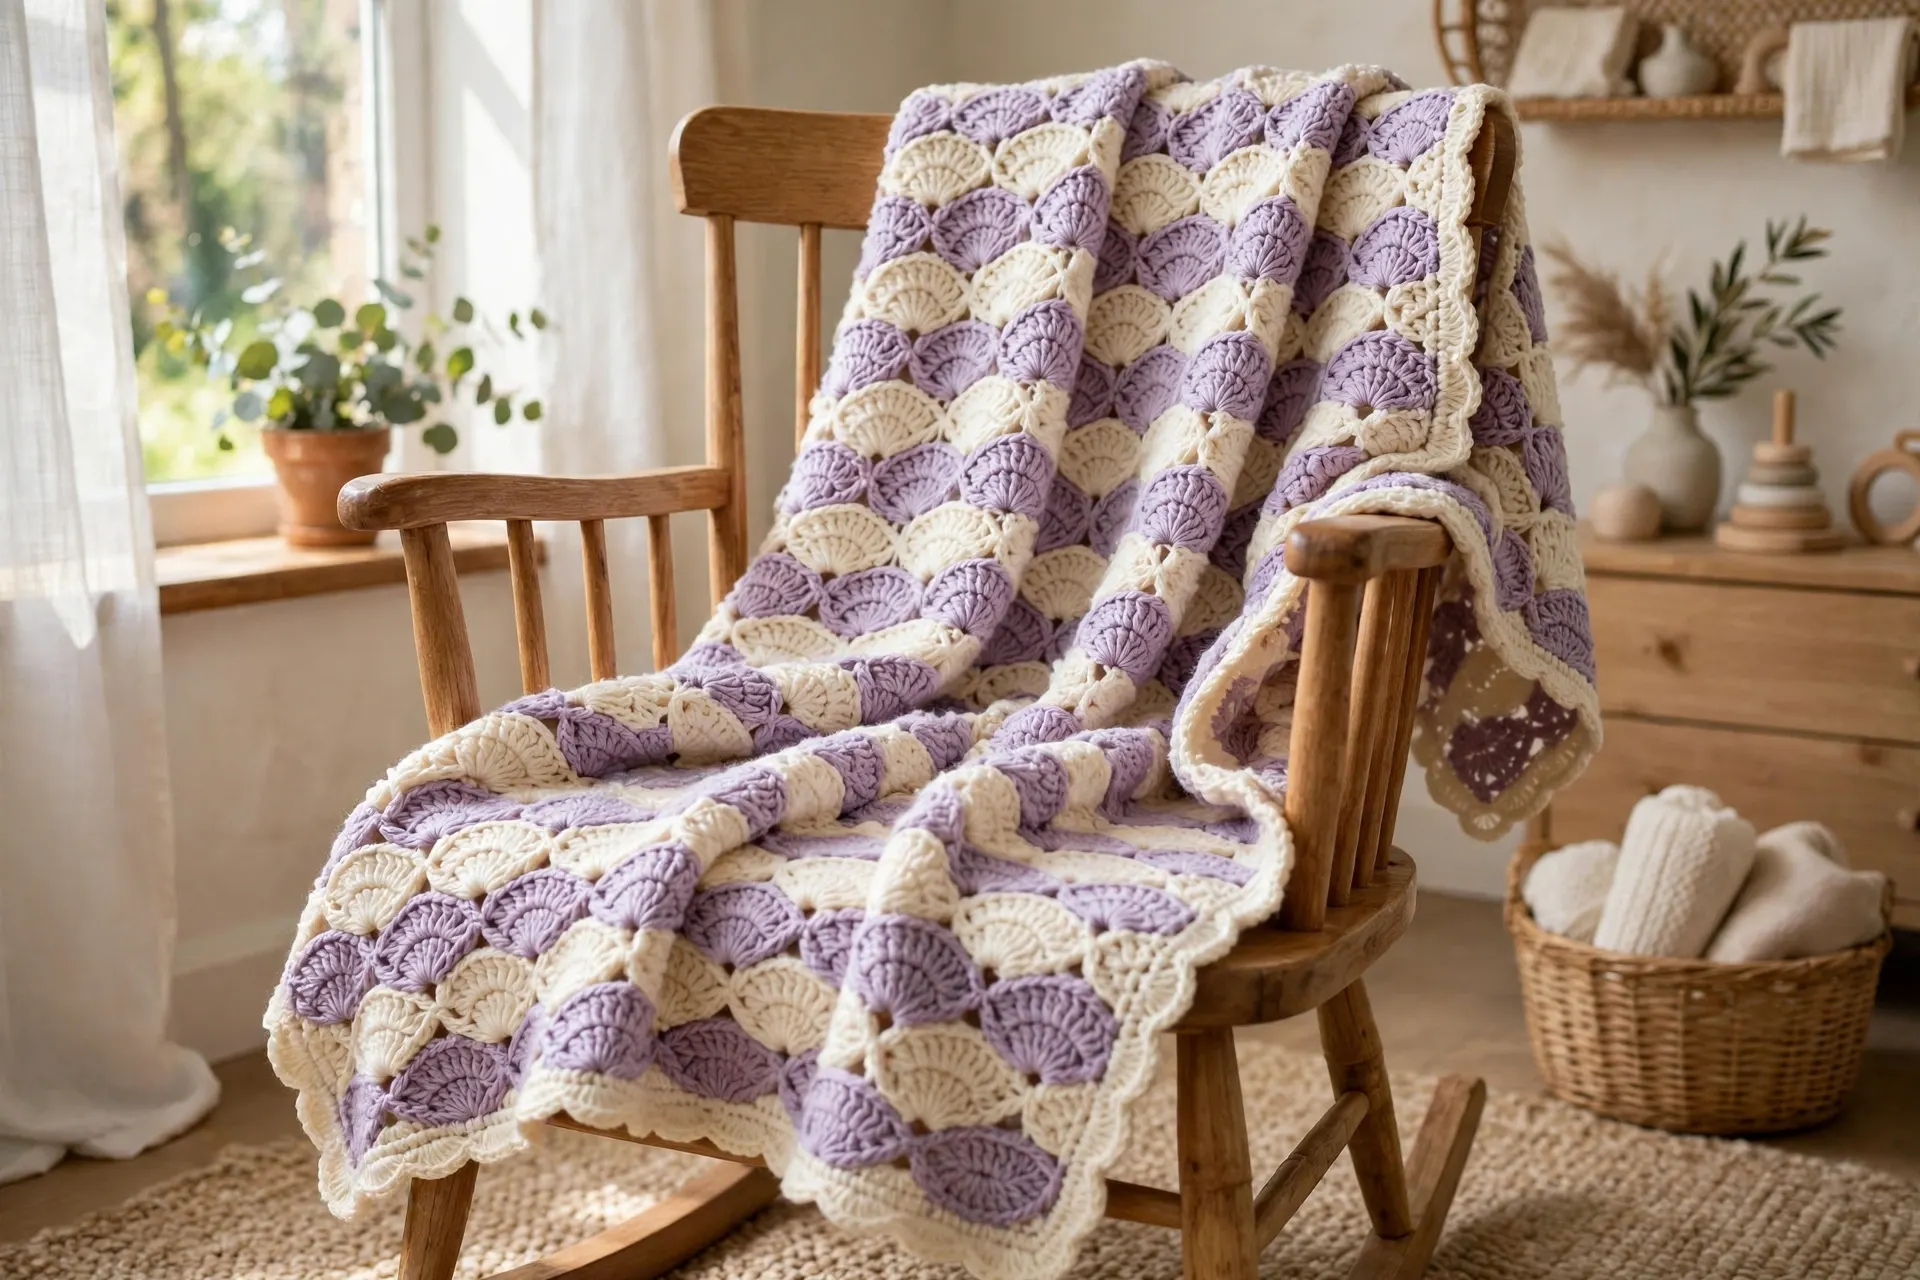
For the blanket’s gentle stripes, change colour every 2 rows so each band contains one full repeat: two rows lilac, two rows cream. Carry the unused colour loosely up the side edge rather than cutting it — the border covers the carried strands completely. Practise one stripe change on the swatch first — far easier on 25 stitches than on 80. A steady repeat keeps this fan stitch crochet pattern even in stripes.
Step 6 — The Blanket Project: Border and Finishing

The baby blanket in this fan stitch crochet pattern is the swatch, scaled up. With lilac, ch 80 (13 fans × 6 chains, + 2). Work Row 1 exactly as in Step 2 along the longer chain: 13 fans and 14 sc. Then repeat Rows 2 and 3 — on the even rows you will have 12 full fans plus 2 half fans and 13 sc — until you have 39 rows in total, ending with a Row 3 and changing colour every 2 rows if you are striping. Before the border, the blanket measures about 30 × 30 in (76 × 76 cm).
Border Round 1: Join cream in any corner stitch. Ch 1, and work sc evenly around: along the top and bottom edges, work 1 sc in each anchor sc and 3 sc spread across each fan (into the 1st, 3rd and 5th dc) — 4 sc per fan unit, 52 sc per edge; along each side edge, work 2 sc into the end of every row (78 sc per side); and work 3 sc into each corner stitch. Join with a sl st to the first sc. (272 sc)
Border Round 2: Ch 2 (counts as hdc), hdc in every sc around, working 3 hdc into the centre sc of each corner. Join with a sl st to the top of the ch-2. (280 hdc)
Border Round 3: Ch 1, work reverse sc (crab stitch) in every stitch around for a firm, corded finish. Join, fasten off. (280 sts)
Weave in all ends along the backs of the fans, then block lightly to about 32 × 32 in (81 × 81 cm).
Tips for Smooth, Even Fans
- Pull every double to the same height. A fan is five stitches sharing one home; if the middle one is taller or shorter than its neighbours, the fan leans. A small tug upward on each dc keeps all five even.
- Keep the anchor sc snug. The single crochet does structural work — it pins the fans apart. A loose anchor lets the fabric sag and the fans drift.
- Mark the centres while you learn. Clip a marker into the 3rd dc of every fan as you complete it. Anchoring becomes a glance instead of a hunt, and the markers come out once your eye knows the spot.
- Count fans, not stitches. At the end of any row, count fans and anchors (13 and 14 on the blanket’s odd rows) — far faster than counting 80 stitches, and it catches errors while they are one row old. The same habit keeps textured blankets like our crochet bobble blanket on track.
Common Mistakes and How to Fix Them
- The fabric fans out wider every row. You are working a full fan into the edge sc instead of a half fan on Row 2 rows — the 3 dc half fans at each edge keep the sides straight.
- Fans stack in columns instead of staggering. An anchor went into the wrong stitch. Anchors always go into the centre (3rd) dc of the fan below, and fans always go into anchors — never fan into fan.
- One edge creeps inwards. The last stitch of the row is being missed, usually the top of the beginning ch-3 on Row 3 rows. Count your anchors at the end of every row until the habit sticks.
- The bottom edge is tight and bowed. The foundation chain was worked too tightly for five doubles to spread in it. Chain with a hook one size larger, then switch back to the 5.0 mm hook for Row 1.
- Holes at the sides of the fans. The two skipped chains under each set-up fan are essential; skip only one and the fans bunch, opening gaps beside them. It is worth restarting the swatch — the blanket depends on this row.
Frequently Asked Questions
Is the fan stitch the same as the shell stitch?
They are close cousins. A shell is any group of stitches worked into one place; a fan is the specific shell used in this fan stitch crochet pattern — always 5 dc, always anchored by a single crochet into the centre of the fan below, which produces the neat staggered fabric. If a pattern just says “shell”, check its stitch notes for the exact count.
Is this fan stitch crochet pattern suitable for beginners?
It suits a confident beginner: you need only the chain, single crochet and double crochet, plus one new habit — finding the centre stitch of each fan. Master the nine-row swatch first; if your fan counts match at every row end, you are ready for the blanket.
How much yarn does the baby blanket take?
About 900 yards of worsted weight in total for the 32-inch square version, including the border — roughly 600 yards of the main colour and 300 of the contrast if you stripe it. In a single colour, buy one extra ball in the same dye lot to be safe; shells use a little more yarn than plain double crochet fabric.
What else can I make with the fan stitch?
Almost anything flat. A chain of 50 (8 fans) makes a scarf about 19 in wide, worked to whatever length you like; the same swatch maths in cotton gives washcloths and dishcloths — our crochet dishcloth patterns round-up has the sizes that work best. For a different baby blanket texture, the honeycomb baby blanket is a lovely companion make.
Why do my fans look squashed instead of open?
Usually the yarn is held too tightly, or the hook is small for the yarn — the five doubles need room to spread. Relax your tension, pull each dc up to full height, and let blocking do the final opening-out.
Final Thoughts
The fan stitch crochet pattern looks like a special occasion and works up like a weeknight: two rows, three basic stitches, and a fabric full of movement. Learn it on the swatch, trust the anchors, and the blanket will feel like it crochets itself. Once your hands know the rhythm, try it in a single soft colour for an elegant shawl — the fans have a way of multiplying into new projects.