Braid Stitch Slippers Crochet Pattern: Cosy Puff-Stitch Slippers in 8 Steps
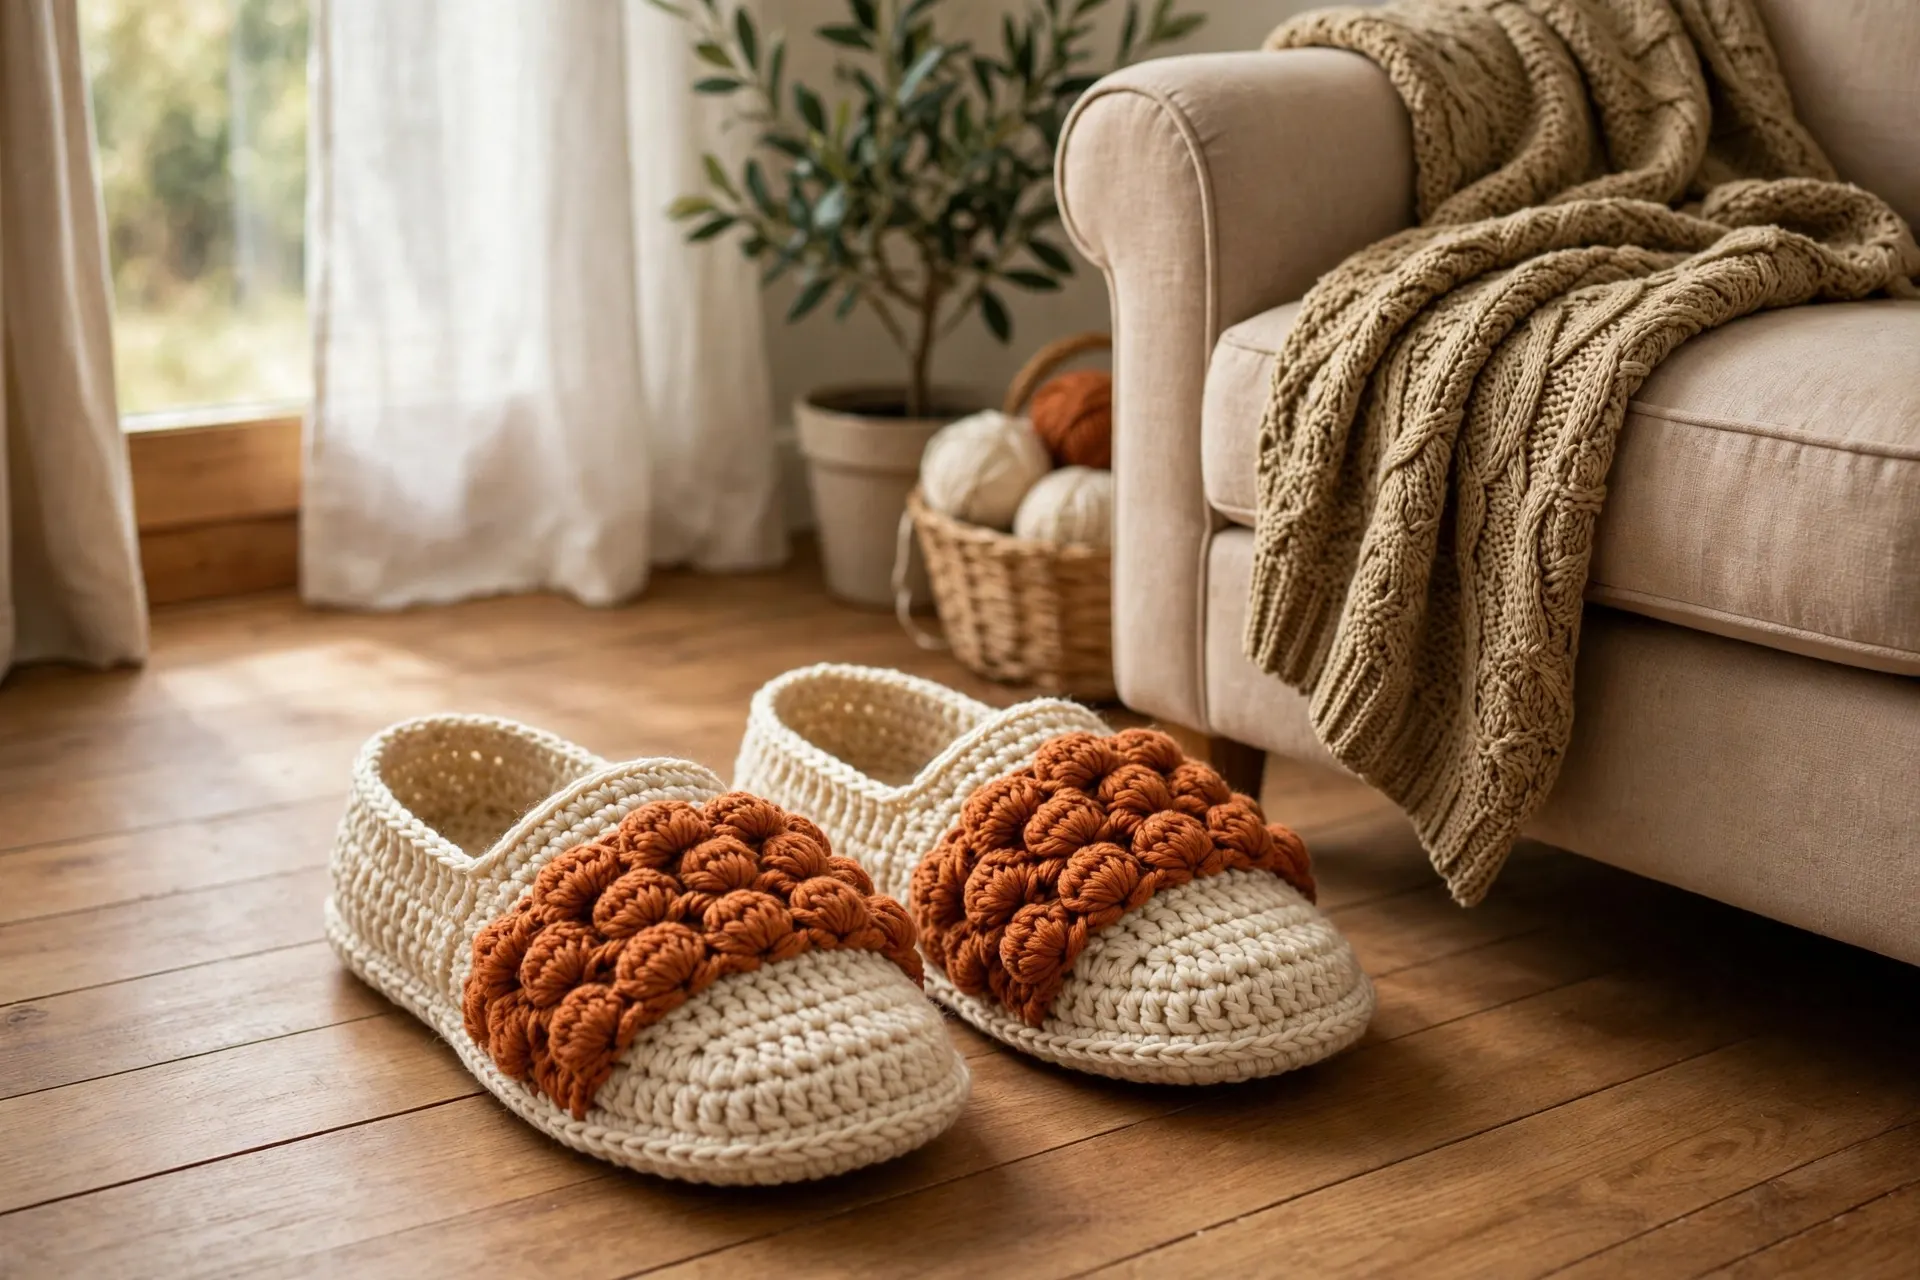
Cold floors are no match for handmade slippers, and this braid stitch slippers crochet pattern is my go-to for a warmer, prettier pair. The slipper itself is simple — an oval sole, low half double crochet sides and a shaped toe — but across the top sits a band of plump puff stitches, staggered row over row so they lean together like a braided plait. It turns a practical house slipper into a gift-worthy pair that works up in an evening or two.
Why You Will Love These Slippers
- The braid band does all the showing off. Three staggered rows of puff stitches across the instep give texture and warmth with no complicated colourwork.
- The fit is genuinely comfortable. Increases shape the sole, counted decreases round the toe, and a firm reverse-crochet edge stops the opening stretching.
- One ball is enough. A medium pair uses about 200 yards of worsted yarn — a brilliant stash project and a fast handmade gift.
- Three sizes, one method. Only the starting chain and final counts change between S, M and L, and every count is given.
- Beginner-friendly stitches, impressive result. If you can single crochet, half double crochet and decrease, the puff stitch is the only new skill (Step 6).
If you enjoy cosy footwear projects, browse our roundup of crochet house slipper patterns for more styles to try next.
Materials and Gauge
What You Need
- Worsted weight (#4) yarn, approx. 200 yd (185 m) for size M — about 180 yd main colour (warm cream) and 20 yd contrast (rust) for the band. Wool or a wool-acrylic blend is warmest and hardiest.
- 5.0 mm (US H-8) crochet hook
- Stitch markers (at least 3), yarn needle, scissors and a tape measure
- Optional: non-slip sole pads, suede patches, or puffy fabric paint for grip (see Step 8)
New to yarn labels? The Craft Yarn Council’s standard yarn weight system explains what the #4 on the ball band means.
Useful Materials from Amazon
Everything for this braid stitch slippers crochet pattern is easy to find:

- Red heart super saver solid yarn
- Made of 100-percent acrylic medium worsted material
- Available for 5-mm knitting needle and 5.5-mm crochet hook
A sturdy worsted acrylic or wool-blend yarn holds the sole’s shape, survives washing, and shows the puff stitches clearly.

- High Quality Material: Our hook head is made of high quality aluminum material, which is durable and not easy to break o…
- Ergonomic Design: Our crochet handles are ergonomically designed. The shape of the grip has been specially designed to a…
- Various Sizes Available: Our crochet hooks are approximately 5.9 inches in length. But we provide you with 9 different s…
Slipper fabric is deliberately dense — a soft-grip ergonomic 5 mm hook keeps your hand from aching through it.

- Non-Skid Pads for shoes: Prevent shoes slips and fall with strong self-adhesive and durable materials.
- Suit for any size of shoes for man or women. Better for high heels, boots, sandals and gents shoes.
- Durable Materials. Made with durable materials with strong stick. Those pads increase extra protector.
Non-slip pads sew or stick onto the finished soles in minutes, turning cosy slippers into safe slippers on wood and tile.

- [150-Piece Value Set in 10 Colors] Get 150 locking stitch markers in 10 colors (15 per shade) to color-code rows, repeat…
- [Smooth Snag-Free Plastic] Lightweight smooth plastic with a gentle locking clasp slides along yarn without catching or …
- [Works for Knitting & Crochet] The slim profile slips onto standard knitting needles, while the secure locking ring mark…
Locking markers are essential here — for the centre front and the braid band — and clip-shut markers will not fall out as you work.
Gauge and Sizes
Gauge: 15 sc and 16 rows = 4 inches (10 cm) in single crochet with the 5.0 mm hook. Gauge matters on slippers — a loose sole stretches, a tight one pinches — so make the Step 1 swatch.
Sizes: Written in full for size M. For S and L, only the starting chain and the final counts change; every shaping sequence stays the same.
| Size | Foot length | Starting chain | Stitches after sole (Round 4) | Stitches after toe shaping (Round 13) |
|---|---|---|---|---|
| S (US 5–6) | 9 in (23 cm) | ch 23 | 64 | 46 |
| M (US 7–8) | 9.5 in (24 cm) | ch 26 | 70 | 52 |
| L (US 9–10) | 10 in (25.5 cm) | ch 29 | 76 | 58 |
Finished sole (size M): approx. 9.5 × 3.9 in (24 × 10 cm). The braid band is worked over 18 stitches (9 puffs) in every size.
Abbreviations (US Terms)
- ch = chain
- sc = single crochet
- hdc = half double crochet
- hdc2tog = half double crochet 2 together (decrease)
- BLO = back loop only
- st(s) = stitch(es)
- Puff st = puff stitch (fully explained in Step 6)
The Braid Stitch Slippers Crochet Pattern, Step by Step
Work Steps 1–7 for the first slipper, then repeat for the second in Step 8. Counts are for size M, with S and L totals in the size table above.
Step 1 — Gather Your Materials and Make a Gauge Swatch

Lay out your yarn, hook and markers, then swatch: chain 17 and work 18 rows of single crochet. Your square should measure 4 inches across the middle 15 stitches and 16 rows. Too many stitches, go up to a 5.5 mm hook; too few, drop to a 4.5 mm hook.
Step 2 — Start the Sole: The First Two Rounds

The sole is an oval worked in joined rounds around a foundation chain, growing at both ends. With the main colour, chain 26.
- Round 1: 3 sc in the 2nd chain from the hook, sc in each of the next 23 chains, 3 sc in the last chain. Turn the chain over and work along the underside: sc in each of the next 23 chains, back to the start. Join with a slip stitch to the first sc. (52 sc)
- Round 2: Ch 1, 2 sc in each of the first 3 stitches (the toe end), sc in each of the next 23 stitches, 2 sc in each of the next 3 stitches (the heel end), sc in each of the next 23 stitches. Join. (58 sc)
Place a marker in the centre stitch of the toe end and leave it there — you will need it for Step 5.
Step 3 — Complete the Oval Sole

- Round 3: Ch 1, (sc in the next stitch, 2 sc in the next stitch) 3 times over the toe stitches, sc in each of the next 23 stitches, (sc in the next stitch, 2 sc in the next stitch) 3 times over the heel stitches, sc in each of the next 23 stitches. Join. (64 sc)
- Round 4: Ch 1, (2 sc in the next stitch, sc in each of the next 2 stitches) 3 times over the toe stitches, sc in each of the next 23 stitches, (2 sc in the next stitch, sc in each of the next 2 stitches) 3 times over the heel stitches, sc in each of the next 23 stitches. Join. (70 sc)
Check your oval against the size table: size M should measure about 9.5 inches long and 3.9 inches wide. Do not fasten off — the sides come next.
Step 4 — Build the Sides: Up and Around

- Round 5: Ch 1, sc in the back loop only of every stitch around. Join. (70 sc) This back-loop round folds the fabric upward and gives the sole its crisp edge.
- Rounds 6–8: Ch 2 (does not count as a stitch), hdc in every stitch around. Join each round with a slip stitch to the first hdc. (70 hdc per round)
After Round 8 the walls stand about 1 inch (2.5 cm) tall. Try the slipper on: sole flat, sides hugging your foot without gaping.
Step 5 — Shape the Toe with Counted Decreases

The toe is rounded by decreasing inside the centre-front 24 stitches only — the 24 stitches centred on your toe marker; the back and sides of every round are worked plain. Count carefully — every round ends with its total.
- Round 9: Ch 2, hdc in every stitch, but across the front 24 stitches work (hdc in each of the next 4 stitches, hdc2tog) 4 times. Join. (66 sts)
- Round 10: Hdc around, working (hdc in each of the next 3 stitches, hdc2tog) 4 times across the front section. Join. (62 sts)
- Round 11: Hdc around, working (hdc in each of the next 2 stitches, hdc2tog) 4 times across the front section. Join. (58 sts)
- Round 12: Hdc around, working hdc2tog 6 times evenly across the remaining 12 front stitches. Join. (52 sts)
- Round 13: Ch 2, hdc in every stitch around. Join. (52 hdc)
The front should now dip into a neat rounded toe cap, with 52 stitches around the ankle opening. Before going on, place a marker at each end of the centre-front 18 stitches — the 6 front stitches plus 6 more on each side. The braid band goes exactly there.
Step 6 — Work the Braid Puff Stitch Band: First Rows

The band is worked flat across the 18 marked stitches at the front of the opening — this is the heart of the braid stitch slippers crochet pattern, so take it slowly.
The puff stitch, defined exactly: Yarn over, insert your hook into the stitch or space, yarn over and pull up a long loop to the height of your work. Repeat that 4 times in total, always into the same stitch, until you have 9 loops on your hook. Yarn over and pull through all 9 loops, then chain 1 to close the puff. That closing chain is part of the puff stitch.
How the braid forms: each row’s puffs sit in the gaps of the row below, so they nestle and lean against their neighbours like a braided plait.
With the contrast colour (rust), join the yarn at the right-hand marker, right side facing you.
- Band Row 1: Ch 1, skip the first stitch, then (puff stitch in the next stitch, ch 1, skip the next stitch) 8 times, puff stitch in the last stitch. (9 puffs across the 18 stitches — 9 worked, 9 skipped.)
- Band Row 2: Turn. Puff stitch in the first chain-1 space, then (ch 1, puff stitch in the next chain-1 space) until you have worked a puff into every space. (8 puffs) Because these puffs land between the puffs of Row 1, the braid lean appears immediately.
Step 7 — Finish the Band and Work the Cuff Edge

- Band Row 3: Turn. Puff stitch in the top of the first puff of Row 2, puff stitch in each of the 7 chain-1 spaces, then puff stitch in the top of the last puff of Row 2. (9 puffs) Fasten off the contrast colour, leaving a 12-inch tail.
Lay the band flat across the instep and whipstitch each short side edge to the edge of the slipper opening with the tail — two or three stitches per side is enough. The band should sit snugly across the top of your foot, like a Mary Jane strap.
Now the cuff, which finishes the opening and locks the top of the band in place. Rejoin the main colour at the centre back of the heel.
- Round 14: Ch 1, sc in each of the 34 stitches around the back and sides of the opening, then work 18 sc evenly across the top edge of the braid band. Join to the first sc. (52 sc)
- Round 15: Ch 1, work reverse single crochet (crab stitch) in every stitch around. Join, fasten off and weave in the ends. (52 sts)
The corded reverse-crochet edge stops the opening stretching with wear and gives the slippers a neat, shop-bought finish.
Step 8 — Make the Second Slipper, Finish, and Add Grip

Repeat Steps 2–7 exactly for the second slipper — the shaping is symmetrical, so there is no left or right foot. Weave in every end, running tails through the backs of stitches in two directions so nothing works loose in the wash. Try both on and check the bands sit level.
Non-slip finish (strongly recommended for hard floors): The soles of this braid stitch slippers crochet pattern are smooth, so add grip before they meet wood or tile: sew on non-slip sole pads or suede patches; dot the sole with puffy fabric paint and dry a full 24 hours; or run beads of hot glue across ball and heel and let them cool.
Tips for Perfect Braid Stitch Slippers
- Pull every puff loop to the same height — a quick tug after the fourth wrap keeps each puff plump and identical.
- Keep the closing chain snug. The ch-1 after each puff closes it; it is not a spacer. Snug chains keep the band firm.
- Practise the puff first. Ten practice puffs teach your hands the rhythm; our waffle stitch dishcloth patterns are full of texture stitches to rehearse on too.
- Try the slipper on at every stage — after the sole, sides and toe shaping — so you can adjust while it is still easy.
- Keep the sole yarn hard-wearing, and block lightly if at all: a gentle steam and a pat into shape is plenty.
Common Mistakes (and How to Fix Them)
- The sole curls like a bowl. Tension is too tight or the increases are off — count them: every sole round adds exactly 6.
- The toe decreases pucker to one side. The decrease section drifted off-centre. Count the 24 front stitches fresh on Round 9.
- The puffs look flat or lacy. Loops were not pulled up high enough, or the closing ch-1 was loose. Work puffs tall, close them snugly, and redo any bad row — it pulls out easily.
- The band gapes at the sides. Add one extra whipstitch per side, sunk into the slipper’s edge stitches.
- The cuff stretches with wear. The reverse-crochet round is the prevention; if you skipped it, unpick the last round and add it.
Frequently Asked Questions
Is this braid stitch slippers crochet pattern suitable for beginners?
Yes, with one small step up: the stitches are basic (sc, hdc, decreases), and the puff stitch — the only new technique — is spelled out loop by loop in Step 6.
How much yarn does one pair actually use?
About 200 yards of worsted for size M — roughly 180 yards main colour, 20 yards contrast. One 220-yard ball of main colour plus a small contrast ball covers any size.
Can I make the slippers without the braid band?
You can — work Rounds 14 and 15 straight across the front stitches instead. But the band makes this design special (and adds warmth across the instep), so it is worth its ten minutes. For more cosy feet, try our crochet sock patterns next.
How do I wash crocheted slippers?
Machine wash gentle and cool in a laundry bag, then reshape and dry flat. Keep hot water away from pure wool soles, which can felt.
What can I make with the leftover yarn?
Most of the contrast ball remains — enough for the same cream-and-rust pairing on our waffle stitch pillow.
Final Thoughts
A good pair of house slippers earns its place by the door, and this braid stitch slippers crochet pattern is built to do exactly that: a counted oval sole that fits, a shaped toe that does not flap, and plump braided puffs that make people ask where you bought them. Make the first pair in cream and rust, learn the puff rhythm, and the gift pairs will practically make themselves.