Crochet Christmas Stocking Pattern: A Free, Easy Pattern for Beginners
Make your holiday decorations extra special with this free crochet Christmas stocking pattern! This classic handmade stocking features a simple single crochet stitch, a traditional red-and-white color scheme, and a cozy ribbed cuff. Hang it on your mantel, decorate your Christmas tree with a miniature version, or fill it with small gifts and treats.
This pattern uses basic stitches and two matching stocking panels, so you don’t need to master complicated sock construction or work a shaped heel in the round. You’ll crochet the panels separately, seam them together, and finish with a folded cuff and a sturdy hanging loop.
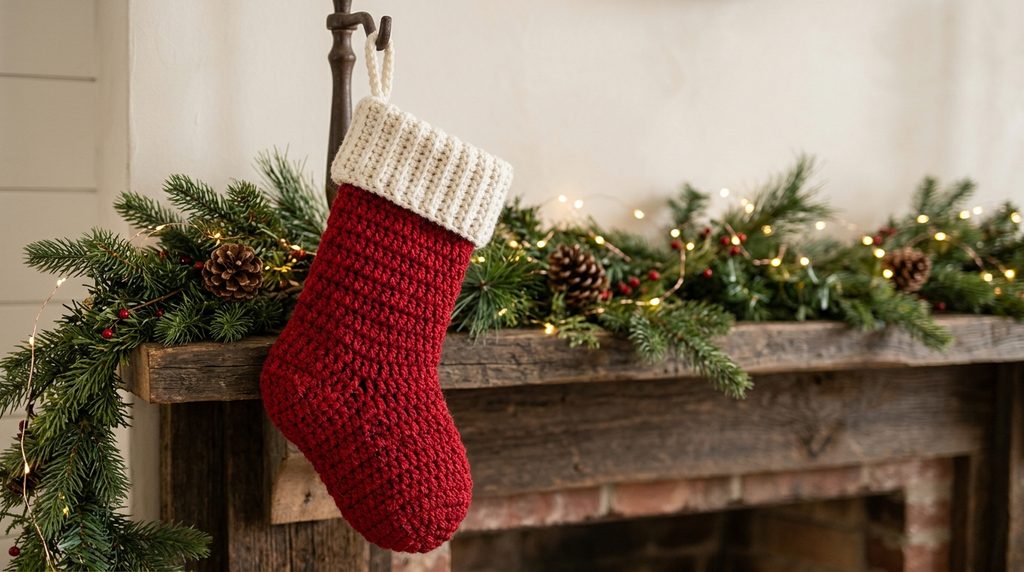
Whether you’re making a stocking for your family, creating personalized Christmas gifts, or preparing handmade items for a holiday craft market, this is a fun project to customize with your favorite festive colors.
Quick Pattern Overview
- Skill level: Beginner
- Construction: Two flat panels joined together
- Stitch pattern: Single crochet
- US crochet terminology: Yes
- Finished size: Approximately 11–12 inches long, including the cuff
- Colors: Two colors recommended
- Special techniques: Increases, decreases, seaming, and ribbing
Finished dimensions will vary depending on your yarn, tension, and gauge.
Materials You’ll Need
- Worsted-weight yarn (#4) in red, approximately 100–120 yards
- Worsted-weight yarn (#4) in white or cream, approximately 40–60 yards
- 5 mm (US H/8) crochet hook
- Yarn needle for sewing and weaving in ends
- Stitch markers
- Scissors
- Measuring tape
These yarn quantities are planning estimates. The amount you use will depend on your gauge, cuff depth, and color choices.
Recommended Supplies
1. Worsted-weight acrylic yarn
Red Heart Super Saver yarn is a useful option for Christmas stockings because it comes in a wide range of colors and is designed for everyday projects. Choose red for the body and white for the cuff, or use green, cream, and gold for a different holiday look. Check the label for the recommended hook size and care instructions.

- Red heart super saver solid yarn
- Made of 100-percent acrylic medium worsted material
- It is available for 5-millimeter knitting needle and 5.5-millimeter crochet hook
2. An ergonomic crochet hook
The Clover Amour 5 mm crochet hook has a comfortable, nonslip-style handle that may be helpful during longer crochet sessions. A regular 5 mm hook works just as well if you prefer to use one you already own.

- Easy grip handle
- Amour means love
- Love crochet
Abbreviations
This pattern uses standard US crochet abbreviations.
| Abbreviation | Meaning |
|---|---|
| ch | Chain |
| sc | Single crochet |
| sc2tog | Single crochet two stitches together |
| st / sts | Stitch / stitches |
| sl st | Slip stitch |
| BLO | Back loop only |
| rep | Repeat |
How to increase: Work two single crochet stitches into the same stitch.
How to decrease (sc2tog): Insert the hook into the next stitch and pull up a loop. Insert the hook into the following stitch and pull up a loop. Yarn over and pull through all three loops on the hook.
Gauge
Work a small swatch in single crochet before beginning.
Target gauge: 16 single crochet stitches and 18 rows = 4 inches (10 cm).
Gauge is important because it affects the finished stocking dimensions and yarn requirements. If your swatch is too large, try a smaller hook. If it is too small, try a larger hook.
Free Crochet Christmas Stocking Pattern
Part 1: Make the Stocking Body
You will make two identical panels. Each panel forms one side of the stocking.
Use your main color, such as red.
Foundation chain: Ch 25.
Row 1: Sc in the second ch from the hook and in each remaining chain across. (24 sc)
Rows 2–14: Ch 1, turn, sc in each stitch across. (24 sc per row)
Keep your stitch count consistent throughout this section.
Part 2: Shape the Foot
The following increases widen one edge of the stocking to begin shaping the heel and foot.
Row 15: Ch 1, turn, work 2 sc in the first stitch, sc in each remaining stitch across. (25 sc)
Row 16: Ch 1, turn, sc in each stitch across. (25 sc)
Row 17: Ch 1, turn, work 2 sc in the first stitch, sc in each remaining stitch across. (26 sc)
Row 18: Ch 1, turn, sc in each stitch across. (26 sc)
Row 19: Ch 1, turn, work 2 sc in the first stitch, sc in each remaining stitch across. (27 sc)
Row 20: Ch 1, turn, sc in each stitch across. (27 sc)
Row 21: Ch 1, turn, work 2 sc in the first stitch, sc in each remaining stitch across. (28 sc)
Rows 22–31: Ch 1, turn, sc in each stitch across. (28 sc per row)
Keep the increases on the same edge of the panel. This creates an angled outline instead of widening both sides equally.
Part 3: Shape the Toe
Now decrease one stitch at each end of every row to taper the toe.
Row 32: Ch 1, turn, sc2tog, sc across until 2 stitches remain, sc2tog. (26 sc)
Row 33: Ch 1, turn, sc2tog, sc across until 2 stitches remain, sc2tog. (24 sc)
Row 34: Ch 1, turn, sc2tog, sc across until 2 stitches remain, sc2tog. (22 sc)
Row 35: Ch 1, turn, sc2tog, sc across until 2 stitches remain, sc2tog. (20 sc)
Row 36: Ch 1, turn, sc2tog, sc across until 2 stitches remain, sc2tog. (18 sc)
Fasten off, leaving a long yarn tail for sewing.
Make a second identical panel, following Rows 1–36.
Important: This is a flat-panel stocking design with a simplified silhouette rather than a traditional three-dimensional sock with a separately shaped heel. If you want a more pronounced heel, you can adjust the outline before seaming.
Part 4: Join the Stocking Panels
Place the two panels together with their matching edges aligned.
- Thread a yarn needle with a length of matching yarn.
- Begin at one top corner and sew down the side edge using a whip stitch or mattress-style seam.
- Continue around the shaped foot and toe.
- Sew up the opposite side, stopping at the top opening.
- Leave the top edge open so you can add the cuff.
- Secure the yarn and weave in the ends.
Keep the stitches evenly spaced without pulling the seam too tightly. Check that both panels line up before finishing the seam.
Part 5: Crochet the Ribbed Cuff
Switch to white or cream yarn.
The cuff is worked in rows and attached to the top opening as you go.
Foundation: Ch 9.
Row 1: Sc in the second chain from the hook and in each remaining chain across. (8 sc)
Row 2: Ch 1, turn, sc in the back loop only across. (8 sc)
Repeat Row 2 until the cuff strip is long enough to fit around the entire stocking opening.
To attach it, work a slip stitch into the next stitch along the stocking opening at the end of each cuff row, then turn and continue the ribbed strip. Keep the attachment stitches evenly spaced around the opening.
When the cuff reaches the starting point, join its short ends with slip stitches. Weave in the yarn ends and fold the cuff outward over the top of the stocking.
Sizing tip: The cuff should fit the opening without stretching it excessively. If it is too short, work additional ribbing rows before joining the ends.
Part 6: Add a Hanging Loop
Use the same yarn as the cuff or choose a contrasting color.
- Attach yarn securely at the back upper corner of the stocking.
- Ch 16.
- Sl st into the same area where the chain began to form a loop.
- Work several additional slip stitches around the base of the loop to reinforce the attachment.
- Fasten off and weave in the end securely.
The loop should be attached to the seamed back edge so the stocking hangs evenly.
Before hanging a filled stocking, test the loop with a light load and reinforce the attachment if necessary.
How to Customize Your Christmas Stocking
One of the best things about handmade Christmas decorations is how easily you can personalize them.
Classic Red and White
Use red for the body and white for the cuff. Add a small green holly applique or a decorative button for a traditional holiday look.
Rustic Farmhouse Style
Choose cream, forest green, and muted red. A simple wooden name tag or embroidered initial adds a personal touch.
Modern Christmas Colors
Try sage green with cream, burgundy with blush pink, or navy with white. These combinations work well with contemporary holiday decor.
Personalized Family Stockings
Make a stocking for each family member and embroider their name onto the cuff. You can also use different colors to help everyone identify their stocking.
Mini Stockings
To create a miniature version, reduce the foundation chain and the number of straight rows, then adapt the increases and decreases while keeping the stitch counts consistent. Make a small test panel before producing several matching ornaments.
Troubleshooting Your Crochet Stocking
Why are my two panels different sizes?
Check your stitch count at the end of every row and compare the panels as you work. Differences in tension can also change the final dimensions.
Why does my stocking curl at the edges?
Tight tension or inconsistent turning chains may cause curling. Try relaxing your stitches and checking your gauge. Gentle blocking may help, depending on the yarn.
Why is the toe uneven?
Make sure each decrease uses exactly two stitches and that you decrease at both ends of every toe-shaping row.
Why is my cuff too tight?
Add more rows to the ribbed strip and avoid pulling the attachment slip stitches too tightly.
Can I use chunky yarn?
Yes, but the finished dimensions will be larger. Use a hook suitable for your chosen yarn and make a gauge swatch before beginning.
Care and Storage
Follow the care instructions on your yarn label. If your yarn permits washing, clean the stocking gently and reshape it while damp. Let it dry completely before storing.
Keep handmade stockings away from open flames and hot light fixtures. Store them in a dry place between holiday seasons to protect the yarn and preserve their shape.
Frequently Asked Questions
Is this crochet Christmas stocking pattern suitable for beginners?
Yes. The pattern uses single crochet, basic increases and decreases, simple seaming, and a ribbed cuff. Beginners should be comfortable counting stitches and following row-by-row instructions.
How much yarn do I need for a crochet Christmas stocking?
For this design, plan for approximately 100–120 yards of the main color and 40–60 yards of the contrasting color. Actual use varies with gauge and cuff size, so having extra yarn is helpful.
Can I sell stockings made from this pattern?
You can generally sell handmade items you make yourself, subject to any applicable pattern terms and local requirements. If you publish or adapt a pattern, make sure you own the written instructions and images you use.
How long does it take to crochet a Christmas stocking?
The time depends on your experience, stitch tension, and finishing details. A beginner may need several hours to crochet both panels, seam the stocking, and add the cuff and loop.
Can I make this stocking in other colors?
Absolutely! Red and white are classic choices, but green and cream, burgundy and gold, or neutral shades also look beautiful.
Final Thoughts
This free crochet Christmas stocking pattern is a festive way to practice basic crochet skills while making a handmade decoration for your home. The simple panels, contrasting cuff, and customizable colors make it easy to create a coordinated set for family members or friends.
Choose your favorite yarn, take your time with the shaping, and remember to count your stitches as you go. Once your first stocking is complete, you can experiment with different colors, appliques, and embroidered names to make every stocking unique.
Happy crocheting, and have a wonderful handmade Christmas!